Plastic Straw Lantern

Plastic Straw Lantern from Ironed Straws

A long time ago I found a tutorial on how to make a lantern from plastic straws. I even tried it and it worked fine. But I gave the lanterns away without taking any photos ;-(

The instruction is in German with illustrating photos.


Here is a translation:
Material:

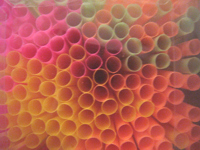
  • Plastic drinking straws
  • Parchment paper
  • Iron
  • An old wooden tray
  • Scissors
  • Double-sided tape
  • Tealight

That’s what you have to do:

  • Lay the parchment paper on your working space, perhaps lay even the old wooden tray underneath.
  • Lay the plastic straws neatly on the parchment paper and lay another layer of parchment paper on it.
  • Iron on highest setting, but without steam over the parchment paper on the plastic straws. The straws will melt.
  • If everything became flat, let the plastic cool down. You can hear that they cool because there is a cracking noise.
  • Carefully release the straws from the parchment paper.
  • Cut the ‘mat’ with the scissors in the form you want.
  • Fix the ends with the tape and put a tealight into.

What I learned when testing it:

  • Best iron in an well ventilated area, because there are (toxic?) vapours.
  • The ironed straws are very, very hot, so make sure to let them cool down thoroughly.
  • Never iron plastic directly, but put always some parchment paper between iron and plastic to protect the iron.
  • Make the lantern big enough, so that it can’t inflame from being to near the flame of the tealight.


Links:
Plastic Straw Lantern (German)
votive

Bead Intertwists

creadoo Perlenschlingen-Bead Intertwists

During my ‘beading time’ I wrote a (German) tutorial for bead intertwists as on the photo.


Here is the English translation:
Material:
for the bracelet:

  • selection of beads (here: various seed beads)
  • colour matching thread
  • needle

additional items:

  • pins
  • styrofoam or cork board
 

What to do:
unikatissima Bead Intertwists - Material
First make a selection of beads and place them at your disposal.

Tip: Uniform colouring connects visually; different forms, sizes and transparency makes it more vibrant.

In this example I used eleven different sorts of blue seed beads, some transparent, some with silver lining and some opaque.
More variety in sizes brings more vitality. The border between vitality and disquietness is to your liking.


unikatissima Bead Intertwists - step 1
Thread beads and make a frame of approximately the right size.

Connect the bead strings from time to time to the borders of the frame.


unikatissima Bead Intertwists - step 2
Weave more bead strings into the frame, connect them from time to time to other strings.

Tip: On the photo the inner bead strings are sometimes multi coloured.
During the work I found out, that this isn’t necessary and that one coloured strings mostly look better.


unikatissima Bead Intertwists - step 3
Continue to weave in bead strings: long strings, short strings, lengthwise, crosswise, over and under.

Tip: When the ‘fabric’ gets tighter it’s easier to work in the bead strings in sections.

On the photo I append about half a dozen white beads to a white string.

Pay attention to make a ‘fabric’ of consistent denseness.


unikatissima Bead Intertwists - step 4
When everything is finished attach any closure, e.g. a bead loop and a colour matching button.

I didn’t make any closure, because the item on the photo wasn’t meant to be a bracelet.


Notes:

  • If the bead strings are carefully woven the ‘fabric’ keeps quite good its form.
  • I used simple cotton thread for the example and wove in the ends with some glue. I could do it this way, because the item was intended to be glued onto a sturdy surface and there would be no strains to the threads.
  • At the beginning it can be difficult to keep the form. The styrofoam or cork board can be of great help when pinning the item to the board.

Have fun!


Links:
Bead Intertwists (Perlenschlingen) (German)

Beautiful Filet Crochet Patterns

Project Gutenberg-Ladies Work-Book Filet Crochet

Another discovery at Project Gutenberg: The Ladies’ Work-Book – Containing Instructions In Knitting, Crochet, Point-Lace, &c. Unfortunately I don’t know when it was published.
You can find there very interesting patterns, e.g. beautiful filet crochet patterns as on the picture.
One day…
;-)


Links:
Project Gutenberg
The Ladies’ Work-Book – Knitting, Crochet, Point-Lace, &c.

Knotsbag

unikatissima Knotsbag

I found another program again to make beautiful things with: Knotsbag.
I’m not so far yet because I haven’t learned so much yet. I have to continue practising until I also can make so beautiful knots :)


Links:
Knotsbag, a Knotwork Design Software (so stunning! ;-))

Here at unikatissima: Entries with the subject ‘digital’

Fried Marbles

craftster Fried Marbles.jpg

Once I found a tutorial on how to make fried/baked marbles: don’t they look great?
I couldn’t make them yet, but I have put them on my to-do-list.

For the wire work she did in the tutorial you can find inspiration and tutorials at WigJig University Jewelry Making Designs as I did for the Tealight Wire Spiral some days ago.


Links:
At craftster.org: Best way to make fried marbles+a suncatcher… kind of.

WigJig University Jewelry Making Designs

Here at unikatissima: Tealight Wire Spiral

Vintage Knitting Patterns

Project Gutenberg-Exercises in Knitting Titlepage.jpg

There’s more to be found at Project Gutenberg: This time a book with knitting patterns from 1846 (when I read the roman cyphers MDCCCXLVI accurately ;-)): Exercises in Knitting.
Unfortunately there are no pictures at all, if you want to know, whether you like the pattern, you have to be able to ‘read’ it from the description or you have to try it.
Not good for unpatient people like me.
;-)


Links:
Project Gutenberg
Exercises in Knitting

Tealight Wire Spiral

unikatissima Tealight Wire Spiral

I browse sometimes at WigJig University – Jewelry Making Designs and found once the Wire and Beads Christmas Tree.
It wasn’t Christmas time then, so I used the wire Christmas tree as inspiration and made me a tealight wire spiral.
It doesn’t look as beautiful as I thought with the tealight lit, because the light shines upwards and the spiral lies in darkness, but I still like it.
I suspended it on a thread and sometimes I let it turn slowly (and carefully!) with the flame burning, that looks lovely.


Links:
WigJig University – Jewelry Making Designs: a fantastic compilation of wire jewelry projects!
Wire and Beads Christmas Tree

Coil a Basket

unikatissima Basket Coiling.jpg

I find another interesting technique basket coiling, where a long thread from (nearly ;-)) any material is to be wound around a curled up thread (also from nearly any material).
It is similar to the clothesline crochet that I presented before, but the thread is to be wound, not crocheted.
On the photo you see my first attempt: I wound plastic raffia around package string.
Actually it should have become a basket, but then I lost my patience ;-)

I followed two tutorials that I find very good, not least because they are heavily illustrated: Pine Needle Baskets (there is also a second part (for the new links see the links below) (and How to coil a basket. In a second entry: More coiling fun… she presents pendants made with the same technique – and which are muuuch more faster;-))


Links:
Pine Needle Baskets – part I
Pine Needle Baskets – part II
The original site doesn’t exist any more and is now available through webarchive (I’m not sure whether some of the illustrations have disappeared?!):
Pine Needle Baskets – part I
Pine Needle Baskets – part II
or here:
Pine Needle Baskets – part I
Pine Needle Baskets – part II

How to coil a basket
More coiling fun…

Here at unikatissima:
Clothesline crochet

Ladies’ Knitted Gloves

Project Gutenberg-Handbook Wool Knitting-Ladies Gloves

At Project Gutenberg I found more books about needlecraft, e.g. the Handbook of Wool Knitting and Crochet from 1918.
They have e.g. nice knitted Ladie’s gloves (see picture).
It’s still warm, we thus have enough time to knit some cute Ladie’s gloves for us/a good friend ;-)
Most patterns are naturally out of fashion, but some knee caps for people who must warm their knees or the Tam-o’-Shanter, a kind of bonnet, can be up to date.


Links:
Project Gutenberg
Handbook of Wool Knitting and Crochet