Clothes From Crocheted Medaillons

Clothes From Crocheted Medaillons

Once I found the website of Jessica Tromp.
Hours later I regained consciousness ;-))

It is difficult to say, what I love best, but in the end I decided, that it must be the crochet patterns for/from square medaillons. But make sure to check all the other crochet patterns also (look for ‘crochet PATTERNS’ in the left navigation bar of her website).

Best of all, she designed a gazillion of clothes and each and every one for different women sizes!
In addition she offers basic woman measurement charts for clothing patterns.

I simply don’t find the right words for this site ;-))


Links:
Jessica Tromp:
Crochet patterns for/from square medaillons
Basic woman measurement charts for clothing patterns

Faux Polymer Clay Agate

Faux Polymer Clay Agate

The tutorial on how to make a faux fossilized agatized coral tutorial on how to make a faux fossilized agatized coral was one of the reasons I began to work with polymer clay – and it became one of the first polymer clay canes I ever made.
As seen on the 2nd photo I decorated a jar with this cane which holds a lot of my often needed tools ;-))

Faux Polymer Clay Agate
Links:
Faux Fossilized Agatized Coral from polymer clay
Tutorial moved to: Faux Fossilized Agatized Coral from polymer clay

Polymer ClayCyclopedia: Polymer clay canes description


Wrap a Rock

Wrap a Rock

Embellishing rocks seems to be quite popular. Some people paint them, some people embroider them, some people felt them, some people wrap them in lace, some people wrap them in polymer clay, some people crochet them and some people bead them.
And if you want them to be fragrant, check back the previous mentioned Fragrant Rocks.
I never did anything with rocks, because I’m living on sandy ground ;-)
But all those rocks rock ;-)


Links:
Painted rocks (via CraftZine)
Embroidered rocks
Felted rocks
Lace wrapped rocks (via CraftZine)
Polymer clay covered rocks
Crocheted rocks
Beaded rocks

At unikatissima’s:
Fragrant Rocks

Embossing Yoghurt Lids

Embossing Yoghurt Lids

Once I found the suggestion to use the metallic lids of yoghurt cups for embossing (but I don’t know where). Some people use tomato paste tubes ;-)
The metal lid of the yoghurt cups is much softer and can easily be distorted, but they had a solution for this (unfortunately I don’t know anymore, who ‘they’ were): they filled the backside of the embossed metallic foil with PVA glue.

I tried it once and I like what happened.
On the photo you see my results: I put the foil on the mouse pad, embossed it, cut it with scissors, filled the back with PVA glue and waited (!) for the glue to dry. I coloured both roses with nail polish.
The items are lightweight and less bulky than the tomato paste tube embossed. They can easily be used for cardmaking.


Links:
Tomato paste tubes revealed

Pain From Crafting

Pain From Crafting - Schmerzen vom Basteln

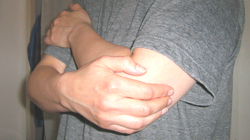
Many crafters, crocheters, knitters and so forth know this: We’re working happily for hours, but when we (have to? ;-)) finish, we feel pain: in the neck, in the shoulders, in the elbow, in the wrists and perhaps in the hips.
Once I read an article from a crocheter, where she said, that she had to work the whole day long (about 10 hours a day if I remember right). She then discussed different ointments that she had tried over the time.
I must say that I was shocked: Such pain is a real drawback on life quality, but there must be a way without drugs and pharmaceuticals.
Later I got those pains myself and I had to figure out, what I want to do against.
After a certain research about RSI (see also links below) I found a way which sounds way too easy and trivial, but which works for me.
And which is one of the most difficult things to do for me, too ;-))

I just take my kitchen timer and set the clock to 15 minutes.
Every 15 minutes, when the alarm goes, I go up from my chair, stretch thoroughly, sit back again and continue (this takes me less than 10 seconds!).
That is the easy part.
The difficult part is for me to really do it!
And not to say: ‘Just this little row and then…’
Often I forget to set the timer to the next 15 minutes as well.
And it is always a disruption. If I’m crocheting, I have to put he hook and the yarn besides. If I’m sitting at my computer, I have to take my hands from the keyboard (although not my thoughts from the subject!).
I don’t like to be disrupted!
But if I follow my line, I can crochet for hours without any pain at all (I tried it).

Just give it a try if you have problems and tell me then, how it works for you.

I consider making a 30-days-trial from it.
This is a way to approach changes in your behaviour. Sometimes one wants to change something, but it doesn’t work. With the 30-days-trial you give yourself a time to test your new behaviour and then to decide: ‘Yes, that’s it.’ or ‘No, I made a mistake by thinking, that I want this.’
I did another 30-days-trial which helped me to change a habit, but it took me three 30-days-trials until I was sure ;-)


Links:
30 Days To Success

About RSI:
I found the website RSIRescue.com- Repetitive Strain Injury. They have lots of material, hints and tips and help for those who suffer from pain from repetitive strain, not only from the computer keyboard.
First check ‘Our Theory in a Nutshell’ in the left navigational bar. Although they’re talking about ‘How Computer Users Get RSI’ I know from my own experience that the problems of crocheters are similar.
Check also ‘Resources’ in the left navigational bar and then ‘Educational RSI Brochure’, where everything is explained very shortly.
Best, if you check all pages ;-))
It helped me a lot to understand where my problems come from and gave me an idea how to prevent further pain.

Leftover Needlework

Leftover Needlework

I have a lot of yarn and thread rests, some of them quite short and I had no idea, what to do with them (except Freeform needlework as a matter of course ;-)).
And then one day I found an article about the ‘Magic ball’ an article about the ‘Magic ball’ and decided that this is it ;-)
In the bottom line it’s nothing else then taking your short threads and knotting them together (with a weaver’s knot e.g.) to get a long enough thread to knit or crochet or what ever you want to do.
On the photo you see three tests I did: On the item above I simply knotted different strings into a long thread and crocheted. It were quite short strings.
For the item below left I took two skeins of yarn, one green and one rose. I knitted with two threads and knotted them so, that I began working with 2 greens, then a green and a rose, then 2 rose, a green and a rose again and back to 2 greens. That way I got a kind of blend between the two colours.
The item below right is made in the same way, but with one light green and one dark green.

I’m sure that I will get back to this technique again.


Links:
Make your own magic using knotted yarn leftovers: the link isn’t available no more.

At unikatissima’s:
Freeform Needlework
Weaver’s Knot

Acryl Coloured Fabric

Acryl Coloured Fabric

As I found the tutorial on how to dye fabric with acryl colours I was thrilled, because I think that this way I can colour my fabric just the way I want.
I tried it immediately, but I have to work on it some more (and I will! ;-))
In a second entry Debra showed what she did with the paper towels she used to clean her workspace: isn’t it stunning?


Links:
Hand-dyed Fabric Trims
Dyed Paper Towels for Paper and Fabric Arts

Loom Woven Bead Bracelet

Loom Woven Bead Bracelet

When working with beads I also wanted to try loom weaving – just to see, how it works ;-)
On the photo you can see both sides of my self-woven bracelet with a self-designed pattern. It was very easy and I like the simple elegance of the pattern.
Because I created the bracelet for me, I didn’t need a closure, I can simply slip the bracelet over my hand.


Links:
Make your own bead loom (with explaining pictures)

Tutorial on Bead Loom Weaving
Another tutorial on Bead Loom Weaving

Two very good pictures (in English text): select in the left sidebar ‘Woven Beadwork’ and scroll down
Two very good pictures (in German text): select in the left sidebar ‘Gewebtes’ and scroll down

Tips to bead weaving (German) at Perlenhobby.de: click on ‘Tipps + Tricks’ in the sidebar left and select there ‘Tipps zum Perlenweben’

Beeswax Collage

Beeswax Collage - Bienenwachs Collage

I find making collages fascinating.
One interesting technique to glue your items to the base is the so-called beeswax collage (for links to tutorials see Links below). It gives a warm colour to the collage and if polished a nice shine too.
On the photo you can see my first (and up until now last) attempt to do this. I collaged pieces of different newspapers (Chinese, Arabic, Corean) and self-made papers and than embroidered the spiral by hand.

Links:
At ARTchix Studio: Beeswax Collage: the link isn’t available no more.

At art-e-zine: Beeswax Collage

Google search results for ‘beeswax collage’
Google image search results for ‘beeswax collage’

Kumihimo Beads

Kumihimo Beads - Kumihimo Perlen

This Thursday’s 2nd challenge Beaded Beauties gave me the opportunity to do something I wanted to do for a long time: making Kumihimo beads.
Kumihimo is a Japanese technique to braid beautiful cords, but then: what do I do with the cord? It’s way too beautiful (and too labour-intensive! ;-)) to be used as a shoelace for instance.
I thought that it would make wonderful beads, but usually the braids are finished by wrapping some string around the braid and such beads would be much too long.


Kumihimo Beads - Kumihimo Perlen Therefore I figured out how to make my own Kumihimo beads.
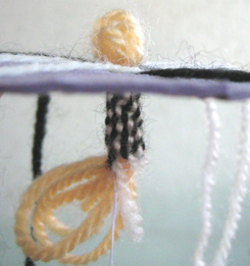
The technique is far from perfect and I hope that you will try it and give suggestions to enhance the technique.

On the first two photos you see Kumihimo beads I made, the blue ones with cotton thread and the black and white ones with acrylic yarn.
All beads were made with 4 light and 4 dark coloured yarns, but I changed the initial positions on my cardboard Kumihimo disk.
You see at the surrounding seed beads how tiny my Kumihimo beads are.


Kumihimo Beads - Kumihimo Perlen What to do:
Make your Kumihimo cord. I worked about 20 rounds.
When finished, pull all threads into the bead.

And that’s where the problem lies:
If you make the Kumihimo cord ‘the normal way’ you won’t have enough place into the bead to pull all 16 threads in (8 threads at each side of the bead).
I tried different techniques to ‘reserve’ a place for the thick bunch of threads. The best one I found was making a bundle of 8 threads of the same gauge and using it as ‘filler’, that means, working around them (see third photo).


Kumihimo Beads - Kumihimo Perlen 
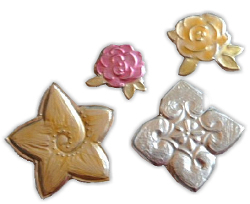
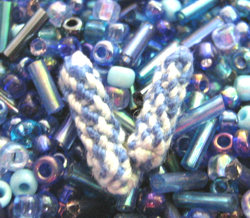
The Kumihimo beads are from fabric and can be stitched however you want. On this photo I surrounded my Kumihimo bead by seed beads and made a kind of Freeform Peyote Pendant.


Links:
This Thursday’s 2nd challenge Beaded Beauties

unikatissima’s Kumihimo How-to
unikatissima’s Freeform Peyote How-to