Kumihimo Pattern Planner

Lytha Studios Kumihimo Pattern Planner

Recently I looked again for pattern generators, after all I made some myself (see links below ;-)) and I want to know what great ideas other people have ;-)

One of these great ideas ist the Kumihimo pattern planner.
You can get with it the initial position of the threads for a simple 8-braid for a given pattern.
They didn’t explain what a ‘simple 8-braid’ is but I think that it is the same as in my Kumihimo entry, I didn’t have the time to check this, yet.


Links:
Lytha Studios KumiPlanner – Kumihimo Pattern Design Application – Beta

Here at unikatissima:
Kumihimo – here you can find also a template for a brainding disk (Marudai) that you can make yourself from cardboard

Entries with the tag ‘Kumihimo’

Maze Pattern Generator
Pattern Generator (Cellular Automaton)
Random Squares Pattern Generator
With this comes the entry ‘What Can You Do With Filet Crochet/Cross Stitch Embroidery Charts?’
crochet medaillon

Simple Napkin Holders

Ordinary Miracles of Life Simple Napkin Holders

Do you still have some cardboard tubes?
What about some simple yet really beautiful napkin holders?

The flower that looks like a rose (Satin Flower) is made in the same technique than the textile roses here, by the way.

Apart from that you can of course use different yarns instead of cord, perhaps even funky yarns?!
Possibly it was fun to use coloured yarns and little plastic toys or Lego pieces as decoration.
And it would look beautiful to make the napkin holders more in the way of the string decorated ornaments, you need less cord then ;-)
But you must paint more ;-))

And then you can always come back to my knitted/crocheted napkin rings ;-), they can be made on a cardboard tube, too, of course.


Links:
Simple and Very cool Napkin Holders
via: yine tuvalet kağıdı rulosu

Here at unikatissima:
Textile Roses
String Decorated Ornaments
Knitted/Crocheted Bangles (and Napkin Rings)
Entries containing the word ‘cardboard tube’

Quick Cords

Faserfimmel Quick Cords

I presented several techniques already to make cords but I’d never thought about this simple and yet so cute idea: place yarns side by side and sew together with a zig zag stitch.
Brilliant!
Unfortunately I can’t do this because my sewing machine doesn’t have a zig zag stitch.
I think I will go on with braiding, weaving, knitting and crochet ;-))


Links:
Quick Cords (Schnelle Schnüre) (German)
Google translation to English

Here at unikatissima:
Fingerloop Braiding
Kumihimo
Clothesline Knitting or Filled I-cord
Clothesline Crochet
Entries with the tag ‘cord’

Cabled I-cord (Kind of)

unikatissima Cabled I-cord (Kind of)


I’ve seen everywhere the beautiful cabled bags and thought that a filled I-cord isn’t so suitable. And then two ideas collided in my head again, this time the I-cord and cabling ;-)

The result is a kind of I-cord which is cabled on both sides but is made with only two needles (plus an auxiliary needle for the cabling).

I created a PDF file (ca. 400 KB) with a photo tutorial that you can download.

Have much fun with it!


Links:
Cabled I-cord (Kind of): PDF file (ca. 400 KB)

Google search result for ‘cabled bag pattern’
Google image search result for ‘cabled bag pattern’

Here at unikatissima:
Clothesline Knitting or Filled I-cord
Knitting Pattern ‘Little Berries
Entries containing the word ‘cable’
Entries containing the word ‘I-cord’

Chevron Takadai Braid

braidweaver Chevron Takadai Braid

Since a long time I take a look at the Takadai braids instructions from time to time – I find them sooo beautiful!
They resemble the Kumihimo braid patterns, but the cords become flat, not round.

But I don’t have any chance to try this because I don’t have the room to place a braiding loom somewhere here.
And I think that I would lose interest very soon.
But anyhow…
;-)


Links:
Instruction for the chevron Takadai braid (Creating Pattern with Texture)
How Taka Dai Braids are Made
Description of the braiding loom (Parts of the Taka Dai)

Here at unikatissima: Entries with the tag ‘Kumihimo’

Fabric Scrap Scarf

craftstylish Fabric Scrap Scarf

Again a scarf from scraps ;-)
But this time it’s not only about scraps nor scarves: It’s about this technique, where you arrange fabric pieces and/or yarns on water-soluble sheet, where you make it ‘unslippable’ by spraying it with fabric glue where necessary, where you cover it with water-soluble sheet again and then sew more or less wildly in all directions to connect all elements with each other.
After rinsing it (thoroughly!) you get a more or less delicate fabric that you can use as scarf like on the photo, but you can also make a top top top or a one-of-a-kind vest one-of-a-kind vest poncho from.

There is even a book that shows how you can mix this technique with felting.

I really must do this once ;-)


Links:

Here at unikatissima:


2 Techniques – 1 Cord

unikatissima Fingerloop Kumihimo Cord

Recently somebody showed me a simple yet beautiful finger loop pattern.
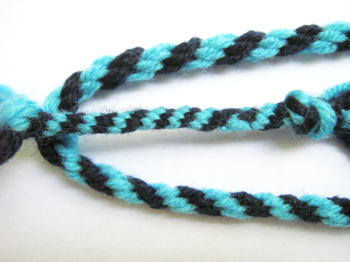
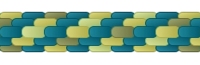
At home I tried it directly again, it is the outer cord (above and below), I braided it first to the left and then to the right.

Then I thought that I worked such a pattern in Kumihimo already, but the one I made worked a little different.
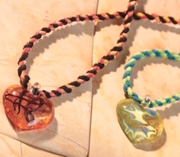
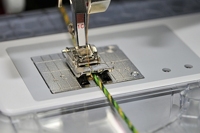
Therefore I transcribed the new finger loop pattern to a Kumihimo pattern (the middle cord on the photo).
The Kumihimo cord became much sturdier because I used quite a heavy weight.

Both are braidung techniques and I reckon that every finger loop pattern can be ‘translated’ to a Kumihimo pattern but surely not the other way round.

Afterwards I did some research and found that ‘my finger loop pattern’ has been described on the pattern page of the Fingerloop Braids Website as ‘A lace bend rounde of 8 bowes — c. 1475’ (viz. it is done with 8 loops in place of 6 loops in my case) – but I never understood the notation ;-))

Here I show you how I made the finger loop cord and the Kumihimo cord, you had perhaps problems with the notation, too ;-)


Finger loop cord

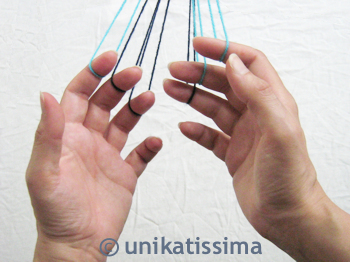
Cut 6 threads of the same length and elasticity and lay them in half to form loops.
Make 3 threads per colour (here dark blue and turquoise).
Knot the open sides together and fix them somewhere to be able to braid with the loops (you can find more detailed instructions in the links of my entry about finger loop).


unikatissima Fingerloop Kumihimo Cord
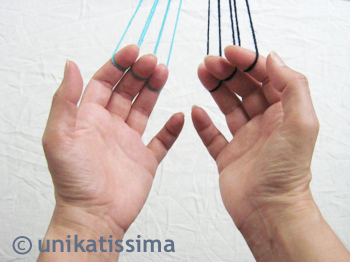
Take the loops of one colour on the index, middle finger and ring finger of one hand and those of the other colour on the corresponding fingers of the left hand.
Here I took the turquoise loops on the left and the dark blue loops on the right hand.


unikatissima Fingerloop Kumihimo Cord
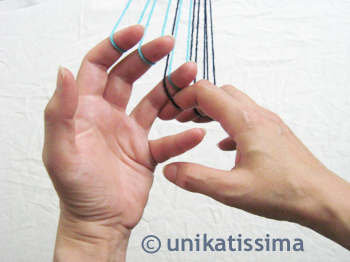
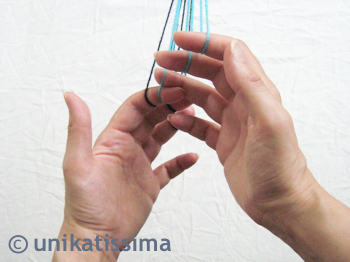
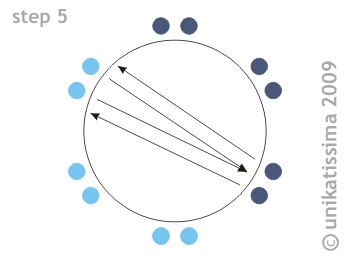
First swap the loops of the right index and the left ring finger.

To do this lay the loop of the right index behind the loop of the left ring finger…


unikatissima Fingerloop Kumihimo Cord
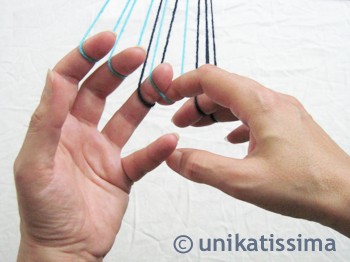
…and take then the loop from the left ring finger on the right index.


unikatissima Fingerloop Kumihimo Cord
You have now on the left hand two turquoise loops (on the index and the middlefinger) and a dark blue loop (on the ring finger) and on the right hand one turquoise loop (on the index) and two dark blue loops (on the middle and the ring finger).

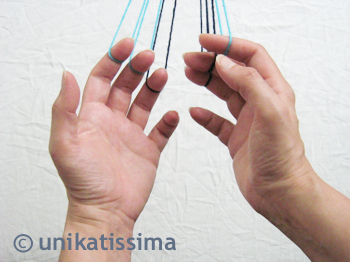
Note: I didn’t take a photo of it, but after every swap open your arms wide to tighten the braid and make it sturdier.


unikatissima Fingerloop Kumihimo Cord
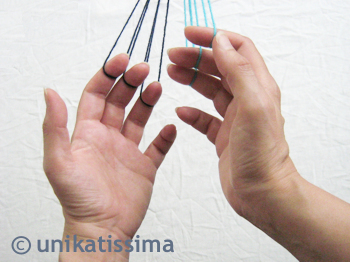
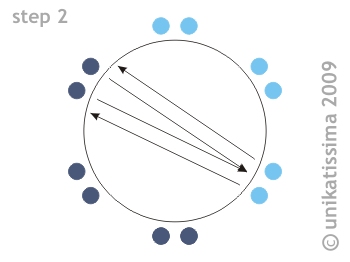
Next swap the loops of both middle fingers in the same way.


unikatissima Fingerloop Kumihimo Cord
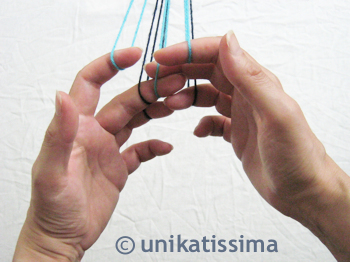
You have now on the left hand one turquoise and two dark blue loops and on the right hand the other way round.


unikatissima Fingerloop Kumihimo Cord
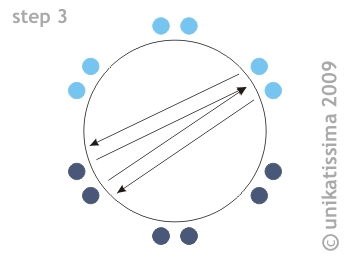
For now the last step is the swap of the loops of the right ring finger and the left index.


unikatissima Fingerloop Kumihimo Cord
Now you have all three turquoise loops on the right hand and the dark blue loops on the left hand.

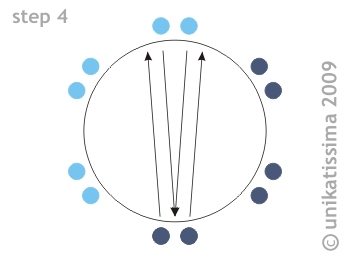
That’s been the first half of the steps to do.
Repeat all steps (index right-ring finger left-swap, middle finger-swap, ring finger right-index left-swap) to bring back the turquoise loops to the left hand and the dark blue loops to the right hand, then you have braid a full round.

Repeat the steps until your cord is of desired length.


Kumihimo cord

Cut here too threads of the same length and elasticity, but this time cut 6 threads of one colour (here turquoise) and 6 in another (here dark blue).
I made the cord on my cardboard marudai, but it was no fun at all because you have to re-lay the threads for this pattern to their appropriate places at every braid.
At least by now is the moment to ‘construct’ a marudai (links to self-made marudai in my Kumihimo entry).


unikatissima Fingerloop Kumihimo Cord
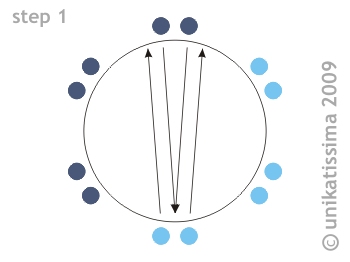
Sort your threads as shown in the graphic.
Lay the upper dark blue thread pair between the threads of the lower turquoise thread pair and then lay both turquoise threads where the dark blue ones have been.
Push together the thread pairs to clearly separate them from each other.


unikatissima Fingerloop Kumihimo Cord
In the second step you do the same with the dark blue thread pair top left and the turquoise thread pair down right.
Here again push together the thread pairs neatly.


unikatissima Fingerloop Kumihimo Cord
In the third step you do the same with the dark blue thread pair down left and the turquoise thread pair top right.

That was the first half of the steps and here, too, the steps must be repeated to get back to the original colour distribution:


unikatissima Fingerloop Kumihimo Cord
Lay the upper turquoise thread pair between the threads of the lower dark blue thread pair and then lay both dark blue threads where the turquoise ones have been.
Always push together the thread pairs neatly.


unikatissima Fingerloop Kumihimo Cord
In the fifth step do the same with the turquoise thread pair top left and the dark blue thread pair down right.
Here again push together the thread pairs neatly.


unikatissima Fingerloop Kumihimo Cord
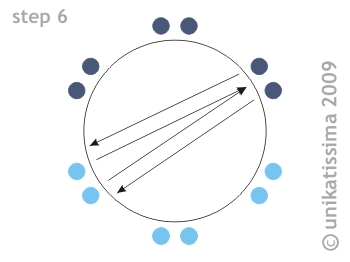
In the last step of this round you do the same with the turquoise thread pair down left and the dark blue thread pair top right.
As always push together the thread pairs neatly.

You have finished the first round now, repeat all six steps until your cord has the desired length.

Have fun with the comparison of the two techniques finger loop and Kumihimo and make some beautiful cords :)


Links:
Marca brandenburgensis anno domini 1260 – that’s where the woman came from who showed me the pattern

Fingerloop Braids Website: Fingerloop Braid Patterns
and there:
the finger loop pattern that I presented here, but with 8 loops (‘A lace bend rounde of 8 bowes — c. 1475’)

Here at unikatissima:
Finger loop
for more detailed instructions see there the links

Kumihimo
   for the construction of a self-made marudai see there the links
   my template for a cardboard marudai

On this page:
Instruction for finger loop cord
Instruction for Kumihimo cord

Clothesline Sewing – A Fabric Bowl

CraftStylish Clothesline Sewing-Sew A Fabric Bowl

After having presented clothesline crochet and clothesline knitting I have now ‘clothesline sewing’ ;-)

The point here is to take a cord and at the same time cover it with fabric and coil a basket from the whole thing just as with the ‘real’ basket coiling.

I find the little baskets absolutely cute, but I have a sewing machine so old that it doesn’t even have a zig zag stitch and I won’t do this by hand! ;-)


Links:
Clothesline Sewing – A Fabric Bowl (How to Sew a Fabric Bowl)

via: craftster: Coiled Fabric Bowls!
via: craftster: Rainbowl! Rainbow Coiled Bowl and Coasters

Here at unikatissima:
Clothesline Crochet
Clothesline Knitting or Filled I-cord
Coil a Basket