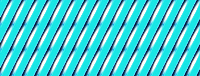
Some time ago I presented the Tartan Generator, now comes ‘his brother’, the stripe generator.
There you can let easily and fast let make striped backgrounds.
I will surely need it, i.e. when creating a birthday card.
Links:
Stripe Generator
…compilation of tutorials
Some time ago I presented the Tartan Generator, now comes ‘his brother’, the stripe generator.
There you can let easily and fast let make striped backgrounds.
I will surely need it, i.e. when creating a birthday card.
Links:
Stripe Generator
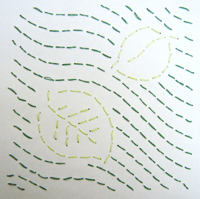
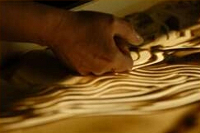
Actually I don’t want to talk only about Sashiko embroidery but about Sashiko embroidery on paper – I just prefer to embroider on paper ;-))
I discovered Sashiko embroidery one day when surfing the internet and found the results just beautiful!
The basic principle (as far as I understood) is that Sashiko embroidery is mostly a shape filling embroidery and the lines are worked as ‘dashed lines’ where the spaces between the dashes are about half as long as the dashes themselves (simply check the tutorials (for ‘real’ Sashiko embroidery) in the links, they explained it better).
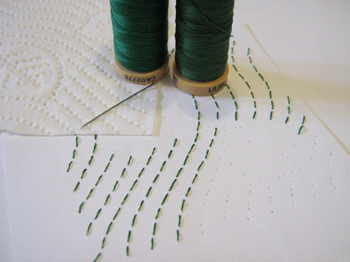
Then I saw one day that our toilet paper (top left on the picture) doesn’t only have a nice pattern but that I can use the pressure points for a Sashiko embroidery by using alternately the left and the right side of the points as needle entry points.
Therefore I trace-pricked the pattern on paper (bottom right on the picture) and embroidered it in two colours.
I find that you can’t see any more on the result that it is made by ‘cheating’ from toilet paper ;-))
 Here a look at the backside.
I will glue it on a card and send as a greeting card.
To people who use different toilet paper ;-))
I find the ‘Scrapheap Background’ very interesting and put it on my just-do-it-once-list.
It made me think a little about the plaster relief …
Links:
The Friday Tut >>> *Scrapheap Challenge*
Here at unikatissima: Plaster Relief

I just wanted to show once more how beautiful embroidery on paper and cardboard can be ;-)
Here I cut a beautiful blue patterned square from a magazine and glued on white cardboard.
Then I drew very faint curved lines with a pencil, pricked holes along the lines and stitched them with a chain stitch.
Looks fine, doesn’t it?
I find though that the chain stitch looks much better on straight lines or wide curves than on sharp turns (it ‘inclines’ somewhat), that’s something one could pay attention to when drawing the lines.
Links:
Instruction for chain stitch
Here at unikatissima: Embroidered Matisse Cushion
Ok, the video ‘You’ve got a friend 2009’ is no tutorial, but so beautiful that I really wanted to present it.
And who knows, perhaps it is an inspiration to somebody?
I’ve only seen the video ‘You’ve got a friend 2009’ until now, the others will follow.
I want to relish them.
Links:
Painting with sand at SandFantasy, i.e. the video ‘You’ve got a friend 2009’
I found a fantastic tutorial on how to colour (more or less) haphazardly stripes of cardboard!
I put it at the top of my try-it-list (and it pushes other things down the list ;-)).
Links:
Psychedelic Batik Cardstock
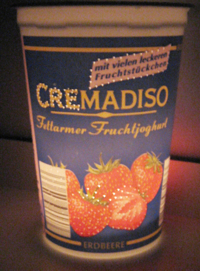
I found an instruction on how to make fun lights from ‘silly’ food packages.
I really like them and wanted to try them immediately.
Therefore I took a look at my kitchen and found the joghurt cup. I thought that the light should shine through and I began with pricking some ‘test holes’.
Looks interesting, doesn’t it?
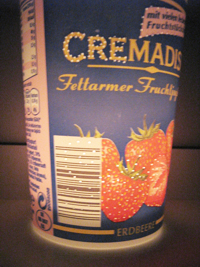 In fact I found the hole pattern around the lettering the most interesting.
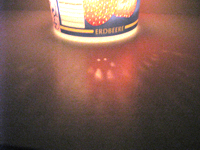 What I also liked was that the lower holes made a nice light pattern.
Links:
Fidgety Fingers: Fun Recycled Food Package Lights
via Junk Mail Gems – DIY Christmas Gifts from Inhabitat
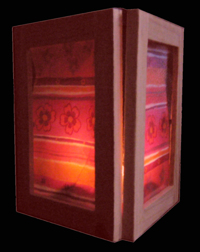
When there comes the time again where you can sit on your patio and dine with friends (ok, ok, it will still take some time, but a woman can dream ;-)), the candle lit photo stands can make a romantic atmosphere.
In the instruction they print their own photos on vellum and glue them on, I preferred my favourite gift wrap.
Besides you should also be able to use the topmost layer of the used paper napkins (possibly glued on vellum), then everything matches even better.
Links:
Photo Centerpiece
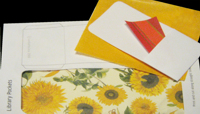
I found a tutorial on how to make a wonderful library pocket book.
Though our library doesn’t have such library pockets and I don’t feel like buying them in internet.
That is why I designed some pockets myself. If you like you can download my library pocket template (link see below).
I’m planning to make a book where the pockets are made from patterned paper, the flower paper on the photo e.g.
For that purpose I will print the template, glue the paper so, that it is patterned on both sides and then cut the pockets from the template.
And then I will begin to embellish ;-))
Links:
Library Pocket Book
Here at unikatissima: unikatissima’s Library Pocket Template (PDF – ca. 80 KB)
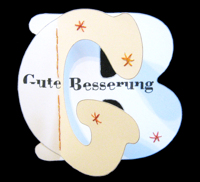
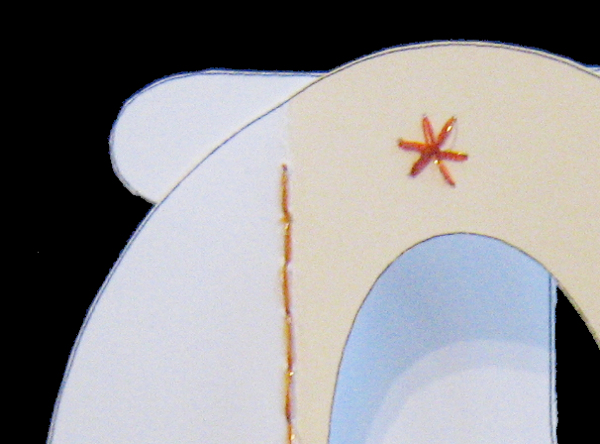
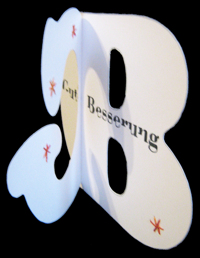
I found an instruction on how to make shaped cards.
I really liked the flower cards e.g., but I’m more one for thinking in words than in pictures. All I could think about when needing a ‘Get well soon card’ was therefore making a card from the letters G and B (in German, ‘Get well soon’ is ‘Gute Besserung’) ;-)
 (Click picture to enlarge)
I joined them with an embroidery stitch (running stitch back and forth) and embroidered some little ‘flowers’ ( I looove embroidery on paper ;-)).
I like it and I hope that it ‘helps’ ;-)

Links:
Creating Shaped Cards
via Nuttnhoney Great Tutorials
Instruction on how to make the Running Stitch
Instruction on how to make the Running Stitch (Vorstich) (German)
Here at unikatissima: Paper Crazy Quilt