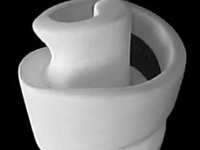
I wrote about plaster freeform sculptures before, but I simply like plaster carving ;-))
Links:
Plaster Carving (Sculpture)
Here at unikatissima:
Plaster Free-Form Sculpture
…compilation of tutorials
I wrote about plaster freeform sculptures before, but I simply like plaster carving ;-))
Links:
Plaster Carving (Sculpture)
Here at unikatissima:
Plaster Free-Form Sculpture
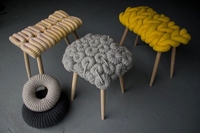
I presented a knitted chair before, but it works also this way ;-)
Links:
Knitted Chairs by Claire-Anne O’Brien – Surprising & Useful Art
Here at unikatissima:
Knitted Chairs
via: Harmloses aus Wolle
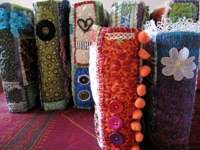
When I’ve seen these Crazy Quilt albums, I’ve been on the verge of looking for an embroidery needle and thread – it’s so long ago that I played around with Crazy Quilts.
There is also a link to a video tutorial.
Links:
Crazy Quilt Albums (Photo Album & Scrapbooking Folder)
Here at unikatissima:
Entries with the tag ‘Crazy Quilt’
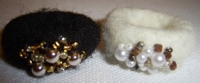
I presented several rings already, but I find these beaded felted rings here great, too.
Links:
Beaded Felted Rings (Gefilzte Ringe) (German)
Google translation of entry
Here at unikatissima:
Entries with the tag ‘ring’
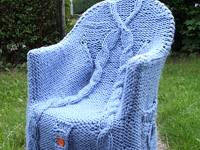
I think that I will never make this knitted chair cover – but I find it great! :))
Links:
The Knitted Chairs – Gallery
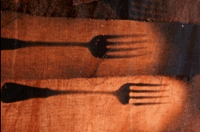
Well, I find these placemats really beautiful :)
Addendum: Hrmpf, the link doesn’t work anymore (thanks, Kalinumba!) and I didn’t find it in webarchive either.
It works in principle like here, but the cutlery has simply been laid down and then the bleach has been sprayed over.
Links:
Project: Bleach Stencil Placemats
Works in principle like here:
Bleach Design Tees with Freezer Paper
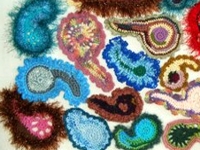
Nearly three years ago I’ve been interested in Paisleys and freeform needlework. After having seen the freeform Paisley scrumbles I’d like to play around with freeform once again ;-)
By the way, the little items are a great way to use up your stash ;-)
Links:
Freeform Paisley Scrumbles
Here at unikatissima:
Freeform Needlework
Entries with the tag ‘freeform’
Entries with the tag ‘Paisley’
Entries with the tag ‘stash’
Doesn’t the bag look great?
There’s even a short instruction (actually it doesn’t have to be longer ;-)):
They are putting a cardboard into the bag so that the dye don’t bleed through to the back side, then they start to doodle the first item with a black fabric pen (washable!), after this the next item and the rest happens all by itself.
They say that the doodling is completely relaxing and that also children have much fun with it.
A Zentangles bag surely would look wonderful, too ;-)
Links:
Doodle Bags (Kritzeltaschen) (German):
 Entry showing the picture
Short instruction
Here at unikatissima: Zentangles
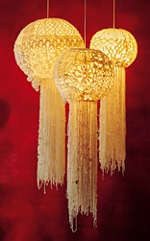
I find the lamps funny ;-)
Especially because you don’t do anything else than freeform crochet on the spherical lamp frames.
But I won’t make them because my ceiling is very low and I had always to go round the lamps ;-))
But I have more lamps ‘on offer’ ;-))
Because the instruction is in German, here a (very short) translation:
You need: sphere lamp frame, different yarns (funky yarns, cotton, wool, ribbon yarn and so on, all in white or nature colours), big crochet hooks (5 mm and 7 mm (for conversion of crochet hooks see links below)) and if you like some big paillettes.
Patterns: They say that it looks best if you use a lot of patterns.
You can find inspiration in their PDF file, where they use the following stitches:
![]() = ch (Chain)
= ch (Chain)
![]() = sc (Single crochet)
= sc (Single crochet)
![]() = dc (Double crochet)
= dc (Double crochet)
![]() = V st (V-stitch)
= V st (V-stitch)
![]() = ps (Puff stitch)
= ps (Puff stitch)
![]() = shell (Shell stitch) with 4 dc, 3 ch, 1 dc
= shell (Shell stitch) with 4 dc, 3 ch, 1 dc
If you click the stitch names here above, you can see how these stitches are worked.
How to: Begin on top: crochet a chain ring to lay around the top opening. Crochet rings of patterns around the lamp, but they say that it looks great, too, if you change the pattern often by e.g. working crochet medaillons and adding them into your patterns.
They suggest to best crochet directly on the lamp frame so that you always can see whether it still fits.
They say that it was better to work too narrow than too wide and that they often worked with a couple of threads at a time with 7 mm needles.
Finish: Sew everything on at the top and bottom of the lamp frame. Cut from all threads fringes of about 1,60 m/4,5-5 inches and add to the bottom edge. If you like to, add some big paillettes.
Links:
Freeform Crocheted Sphere Lamps (Umhäkelte Leuchtkörper) (German)
Stitch descriptions:
ch (Chain)
sc (Single crochet)
dc (Double crochet)
V st (V-stitch)
ps (Puff stitch)
shell (Shell stitch)
Possibly helpful sites:
Crochet Hook Sizes And Conversions
Converting a pattern from US terms to UK terms
Here at unikatissima:
Entries with the tag ‘box’
Entries with the tag ‘lampshade’
