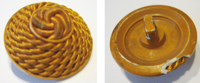
Isn’t it a great scarf?
I made immediately a note of this instruction, I’d really like to crochet it once – although it may be ‘heavy’ wearing ;-))
Links:
CRAZAY Ruffle Scarf
…compilation of tutorials
Isn’t it a great scarf?
I made immediately a note of this instruction, I’d really like to crochet it once – although it may be ‘heavy’ wearing ;-))
Links:
CRAZAY Ruffle Scarf

This time it’s no ‘real’ instruction but an inspiration: Embellished Grapefruits Embellished Grapefruits. (Click there for the actual pieces on the thumbnails and see e.g. Two Pods Two Pods.)
Because I’m always impatient I preferred to use a piece from an orange – grapefruits are so big ;-)
While working I had a lot of fun.
I like the embroidery of orange peels nearly as much as embroidery on paper. The most uncommon thing I had to do was to give my needle a wash ;-))
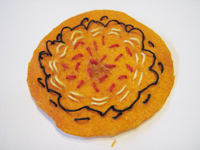 After the embroidery I put the orange peel between several layers of tissue paper in an old telephon book and let it dry ‘flat’.
Actually I had hoped that I can coat it with medium gel afterwards and wear as a pendant, but I don’t really like the ‘flat version’ of my orange peel.
 I find worst that the threads now stand up now like croquet wickets, I really don’t like this.
At the next opportunity I will see if I can make it better.
If it works I will perhaps embroider beads on, that should be interesting, perhaps Paisleys or simply Freeform.
Links:
Grapefruit – click there for the actual pieces on the thumbnails and see e.g. Two Pods
The original site doesn’t exist any more and is now available through webarchive:
Grapefruit – click there for the actual pieces on the thumbnails and see e.g. Two Pods
Embroidery stitch descriptions (English)
Embroidery stitch descriptions (German)
Here at unikatissima:
Paper Crazy Quilt
Freeform Bead Embroidery
Bead embroidered Paisleys
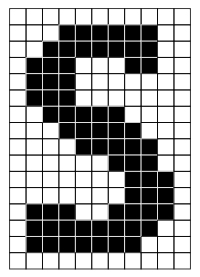
I found a very cute idea at glassattic: letter canes from polymer clay.
Somebody writes there: ‘I made a nice letter cane using the mosaic “pixels” method taught by CityZen Cane…turned out nice!
….tip: wrap the letter itself with a sheet of background color before adding mthe rest of the background color, to avoid “chinks” in letter’s edge’
In other words they worked in a similar way than for the Checkerboard Cane: they rolled out two different coloured sheets from polymer clay, cut them into stripes and put those stripes together to a ‘pixelated’ letter cane.
The letters from the Celtic Cross Stitch Generator could be used as templates.
Or, if you don’t want to make a letter, perhaps my Cross Stitch Heart!? ;-)
I already prepared the first letter of my name, but I won’t have the time to make such a letter cane very soon.
Sigh.
;-)
Links:
Note about letter cane (check at ‘WRAPPED:’ => ‘……Mosaic’)
In the Polymer Clay Cyclopedia: Checkerboard Cane
Here at unikatissima:
Celtic Cross Stitch Generator
Cross Stitch Heart
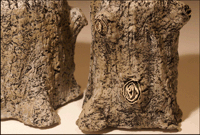
I’ve seen several paper maché objects, but jars looking like stumps are still something special to me.
Something especially cute ;-))
I’m not totally sure that I should make them myself ;-), but I liked them so much that I wanted to present them here.
Furthermore I didn’t know this paper maché preparation, I really like to give a try some day.
Links:
Papier-mâché Faux Bois
via One Pretty Thing
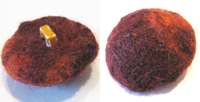
I presented already several tutorials with the subject ‘felting’ but I always discover more that I find brilliant and where I would never have had the idea myself.
One of them is the idea to felt buttons (German with good explaining photos).
 I have lots of old buttons and as you can see on the photo not all look very nice.
I like the felted button much better, even though it was nothing but a first test.
I think that I could even embroider it, just like the needle felted bead cabochons and the bottlecap pincushions.
Links:
Felting Buttons (Knöpfe umfilzen) (German with good explaining photos)
via faserfimmel
Descriptions of embroidery stitches (English)
Descriptions of embroidery stitches (German)
Here at unikatissima:
Entries with the subject ‘felting’
Needle Felted Bead Cabochons
Bottlecap Pincushions
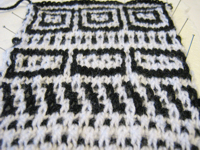
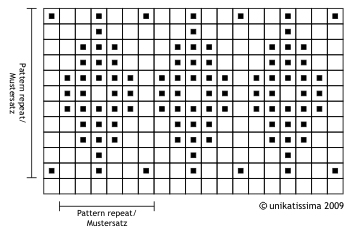
Recently I found a how to for mosaic knitting how to for mosaic knitting and I’m thrilled!
I know slip stitches for some time but I never realized what you can do with them.
The point is two-colour knitting of fine patterns (no big areas!) but only using one thread at a time.
That’s a great relief as everybody knows who tried like me to do some intarsia knitting and was busy to detangle the yarns half of the time ;-)
 You can’t mosaic knit all patterns very easily, slants e.g. have their own difficulties.
I’m publishing two diagrams for rhombs further below which may be of help.
Anyway there remain enough patterns that are fun and can be knitted quite fast. I even found a mosaic knit alphabet chart, but didn’t try it. But you can see that mosaic knitting is different from normal two-coloured knitting like intarsia or fair isle knitting.
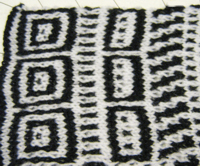
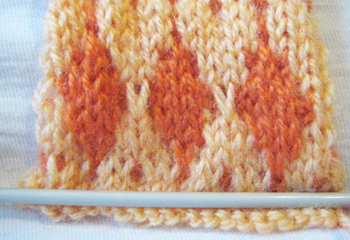
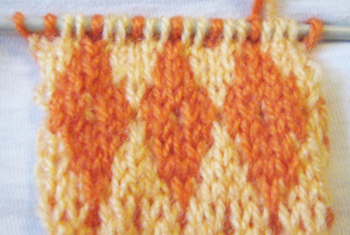
Here I’m showing my swatch all around ;-) I simply tried there which patterns I can knit and I really like it :)
What I like, too, is that the floats on the back (therefore only fine patterns) make the fabric more firm than I can ususally knit.
This way even I could knit mittens where the wind won’t go through ;-)
I didn’t find a German tutorial (which doesn’t mean that there is any!) and although the English tutorial on how to mosaic knit English tutorial on how to mosaic knit was of a great help I was so fascinated that I wrote a German instruction.
Which I now simply translate ;-)
That’s how to:
(Click pictures to enlarge)
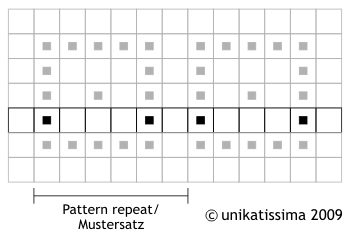
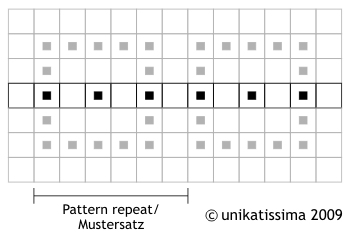
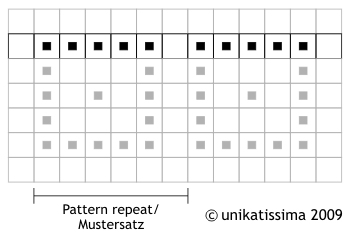
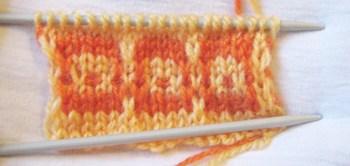
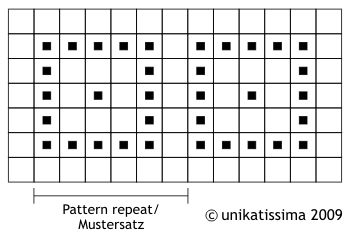 This is the patterns we will use to learn mosaic knitting.
Every row of this chart will be knitted to and fro, the colours will be alternating.
And this is how the symbols and photos are related:
![]()
![]()
![]()
![]()
 I will knit three of the little squares (= 19 st) and add two edge stitches (= 21 st).
First cast on the desired number of stitches in light yellow (that is ![]() ) and then knit one row to and one row fro (i.e. knit the first row and purl the second).
) and then knit one row to and one row fro (i.e. knit the first row and purl the second).
Those two rows correspond to the lowermost row in the diagram.
Note: Apparently you can knit in garter stitch or partly in garter stitch, too. In the english tutorial english tutorial she knits e.g. the second colour in garter stitch, which means, that she works the four rows as follows: knit, purl, knit, knit.
Note: Always knit both edge stitches!
I’m knitting every first stitch of the row and slip the last, but you can knit other edge stitches, too.
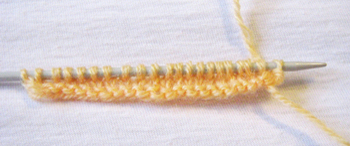
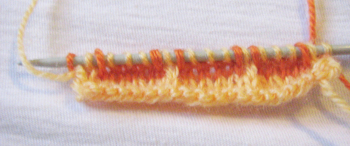
 I told before that we will knit two rows of every colour. Because the first two rows were light yellow, we’re working the next two rows with the orange thread, the yellow one simply stays where it is.
Following the diagram knit all ![]() in orange, all
in orange, all ![]() simply slip without knitting.
simply slip without knitting.
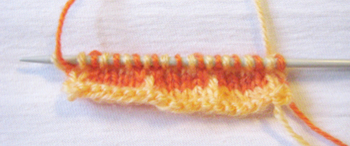
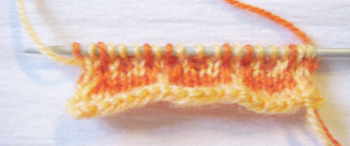
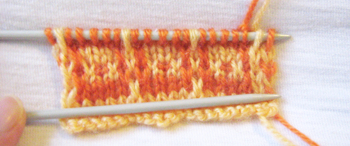
That’s how it looks after the first row in orange (left photo) and after the second row (right photo).
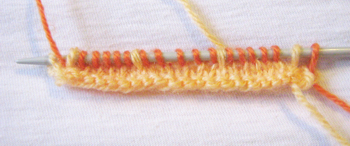
Because the fabric curls I made an extra photo. You can see very well the light yellow slip stich which reaches over both orange knitted rows.
 We’re working the next two rows with the light yellow thread, the orange one simply stays where it is.
Following the diagram knit all ![]() in light yellow, all
in light yellow, all ![]() simply slip without knitting.
simply slip without knitting.
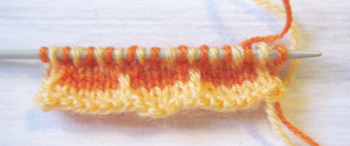
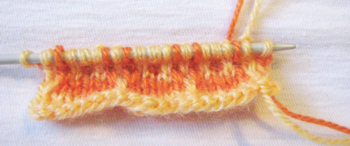
That’s how it looks after the first row in light yellow (left photo) and after the second row (right photo).
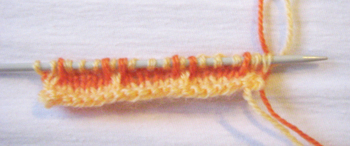
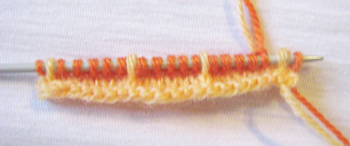
Here I made an extra photo, too, because the fabric curls.
This time you can see very well the orange slip stiches.
 We’re working the next two rows with the orange thread again, the yellow one simply stays where it is.
Following the diagram knit all ![]() in orange, all
in orange, all ![]() simply slip without knitting.
simply slip without knitting.
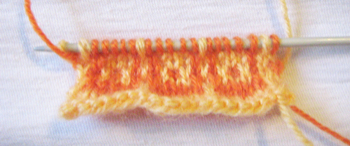
That’s how it looks after the first row in orange (left photo) and after the second row (right photo).
From now on I didn’t make no more extra photos.
 Because we’re alternating the colours we’re working the next two rows with the light yellow thread, the orange one simply stays where it is.
Following the diagram knit all ![]() in light yellow, all
in light yellow, all ![]() simply slip without knitting.
simply slip without knitting.
That’s how it looks after the first row in light yellow (left photo) and after the second row (right photo).
 We’re working the next two rows with the orange thread again, the yellow one simply stays where it is.
Following the diagram knit all ![]() in orange, all
in orange, all ![]() simply slip without knitting.
simply slip without knitting.
That’s how it looks after the first row in orange (left photo) and after the second row (right photo).
 I simply added two knitted rows in light yellow and the pattern ends.
I confess that I’m not a very good knitter, but there’s no reason why your items shouldn’t look more evenly ;-)
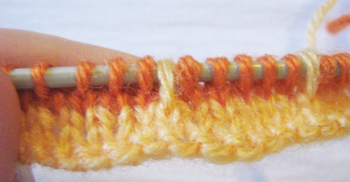
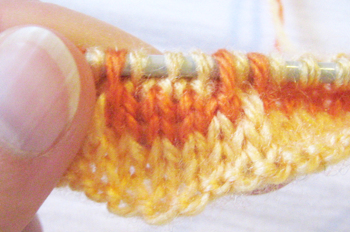
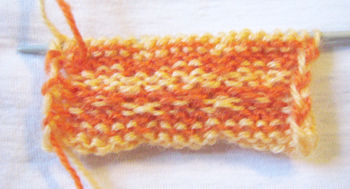 This is a photo of the back: You can see very well that we don’t have no long floats on the back with this technique, although we knitted 2 rows with groups of five in orange.
That is because we were alternating the colours: we were able to knit them in place of slipping them.
I’d always design a pattern in a way that I’d never have to slip more than 3 stitches but that’s purely a matter of taste.
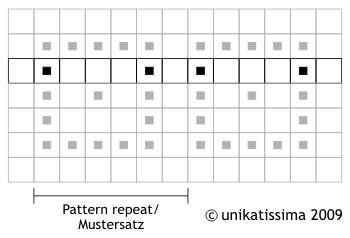
Rhombs:
I played around with rhombs to see if I can make general statements about slants, but although I managed to create two possible rhomb patterns (see the following pictures) I still don’t understand slants:
I find that silly!
The difference between both patterns is the middle part: the first pattern has just one middle row, the second three.
The little orange dots (stitches) in the first and last pattern rows as well as the yellow dots in the middle of the rhomb make sure that no more than 3 stitches are to be slipped and make the pattern a little more dynamic at the same time.

Links:
Mosaic Knitting – you can find the link to the tutorial as PDF-file (ca. 440KB) there in the first paragraph
On the same website you can find a tutorial for a cute bag in mosaic knit
The original site doesn’t exist any more and is now available through webarchive:
Mosaic Knitting – you can find the link to the tutorial as PDF-file (ca. 440KB) there in the first paragraph
On the same website you can find a tutorial for a cute bag in mosaic knit
Mosaic Knit Alphabet Chart – you can find there a link to the Mosaic Knit Alphabet Font which should mean (I didn’t download the font) that you can write any word in your word processing program, print and knit them after installation.
Here at unikatissima: Intarsia Knitting
I found the instruction on how to make wine glass candle lampshades neat, but I don’t have to rely on pre-made templates any more, because I know how to construct a cone ;-))
That’s exactly what I’ve done, additionally I didn’t use no wine glass but a water glass.
 Admittedly a wine glass would look better, because the tea light is hidden then.
Or I should cover the lower part of the water glass.
Or I should make the cone higher (and I can ;-)).
I made my lampshade from sandwich paper which is actually too fine and doesn’t hold the shape (in the instruction they are using vellum). To improve this I taped some clear tape against the paper from the inside.
But it didn’t help very much.
 Before I cut the lampshade I embellished it with some flourishes – looks cute, doesn’t it?
This is my cone calculation (shortened version):
Desired data:
 Height H = 6 cm
Upper radius Rt = 3 cm
Lower radius Rb = 5 cm
Calculation:
PQ = Rt * H / (Rb – Rt) = 9
QT = 3
PT = sqrt(81 + 9) = 9,5
PR = 15
RS = 5
PS = sqrt(225 + 25) = 15,8
That is:
Outer radius = 15,8 cm
Inner radius = 9,5 cm
a = 360 * (1 – ((2 * Pi * Rb) / (2 * Pi * PS))) = 360 * (1 – (31,4 / 94,8) ˜ 241°
Great, isn’t it? ;-)
As you can also see on the topmost photo, another advantage of self-calculation is that the upper rim of the lampshade barely protrude over the rim of the glass and therefore the danger of fire is reduced.
Anyhow: Always be careful!
;-)
Links:
Wine Glass Candle Lampshades
Here at unikatissima: Calculation of a cone on the basis of the desired height, desired upper and lower diameter
I found a great instruction on how to make a beaded I-cord.
She knits an I-cord where she works in previously stringed beads.
 Because I only had seed beads I simply took some of my buttons and must say that I like the result, also.
My I-cord is a little bit uneven, because the heads of my buttons often got in my way, but I like it nevertheless ;-)
Links:
an anti pattern
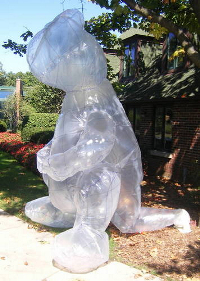
Ok, such a giant plastic inflatable dino is nothing that you really need, but isn’t he beautiful?
Sigh, I really don’t have room for him.
Links:
At craftster: Giant Plastic Inflatable Dino
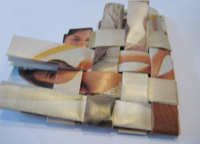
I really liked the woven magazine coasters and the beginning was in fact easy to do.
But for whatever reason I haven’t been able to finish them properly – clumsy fingers or something like that ;-(
But one day…
;-)