Some time ago I presented the Tartan Generator, now comes ‘his brother’, the stripe generator.
There you can let easily and fast let make striped backgrounds.
I will surely need it, i.e. when creating a birthday card.
Links:
Stripe Generator
…compilation of tutorials
Some time ago I presented the Tartan Generator, now comes ‘his brother’, the stripe generator.
There you can let easily and fast let make striped backgrounds.
I will surely need it, i.e. when creating a birthday card.
Links:
Stripe Generator

I noticed it but yesterday: Saturday is WWKiP Day 2009 again, the day when people knit together in public.
Originally it was meant to bring together knitters from a region, because who knows who else is knitting in their immediate surroundings?
Then many participate to show that knitting is not only for ‘old women’, but really for everybody.
Take a quick look at the official website to see whether there’s a meeting in your surroundings, too and then have fun on Saturday!
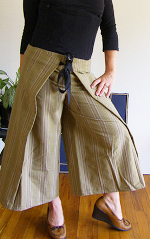
Isn’t it great: I admired those wrap pants for ages on various artist markets but somehow I could never figure out how to sew them.
And now I discovered a complete tutorial at craftster :)
The thread is quite long but it’s worth to read it because they’re giving lots of tips, tricks and ideas.
If you like it, too, please respect her request not to compete with her because she wants to get a little money with them and even so she wrote liberally a tutorial and presents it (without even charging money!) (quote: “I decided to share this tutorial despite the fact that I’m currently making these to sell, so please use this tutorial for your own personal purposes.“, you can find the text below the last photo of the tutorial).
Links:
At craftster: Easy Breezy Wrap Pants Tutorial

Recently I’ve seen these fantastic beaded flowers at craftster.
Usually I’m not one for beaded flowers but I find these so beautiful.
The thread is no tutorial and it seems that she hasn’t written one yet (I’d say that she don’t want to) but somewhere in the comments they mention a basic tutorial for French flower beading that I found great at first sight.
Perhaps soon;-)
Links:
At craftster:
 French Flower Beading
Other threads of the same author, some of them show French flower beading, too
I discovered recently ‘knit weave’ (you can see pictures when following the links).
I like it! ;-)
Knit weave is mostly worked on knitting machines by laying a thread on the stitches. This thread is then trapped in the stitches and can be seen sometimes on the front side, sometimes on the back side of the item.
I found this interesting and thought that it should be possible to do this by hand.
I didn’t find very much (see links), therefore I’m reporting my own experience here.
Just a note: ‘knit weave’ can be translated in German by ‘Webstricken’, but when googling Webstricken you get quite different results: there are knitting needles where you can thread in an extra thread that will be worked in your item when knitting. But it looks different from ‘my’ knit weave.
That’s what you do:
In principle you carry an extra thread with you that will be laid on the front side and the back side of your work, alternately. That’s like weaving: the weft will be brought over and under.
I suggest not to let the extra thread lay on one side longer than four stitches. The float will get too long and your fingers can get caught.
Always check the extra thread tension to prevent it from hanging or contracting the knitted stitches.
You can see best what I’m talking about when checking the following examples:
My first item.
I knitted the yellow item in a rib pattern two knit-two purl to prevent it from curling.
While knitting I carried a red thread that I always laid two stitches on the front side and two stitches on the back side of my work.
The back side looks similar.

 These are both patterns I used for my first item.
A filled square means: ‘lay the thread on the front side of your work’, an empty square means therefore ‘lay the thread on the back side of your work’.
(To download simply click on the image with the right mouse button and use something like ‘Save image as…’.)
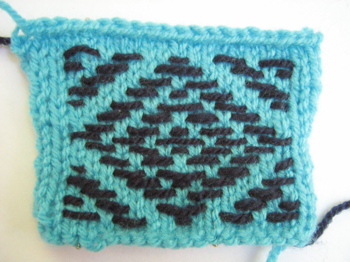
My second item: This time I used kitchener stitch and I was pleasantly surprised to see that the item nearly don’t curl when knit woven.
Note: I’ve been told that this is not the kitchener stitch but the stockinette stitch.
In the end it doesn’t matter which stitch you use (to a certain point ;-)), but I see that I have still lots to learn about the English knitting vocabulary ;-)).
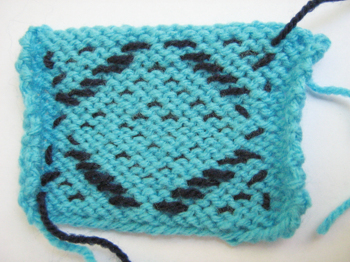
Here the back side: just as with multi-coloured knitting.
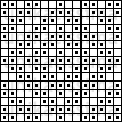 That is the diamond pattern I used for my second item.
(The download works in the same way as above.)
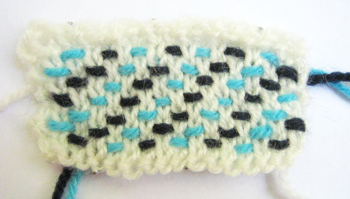
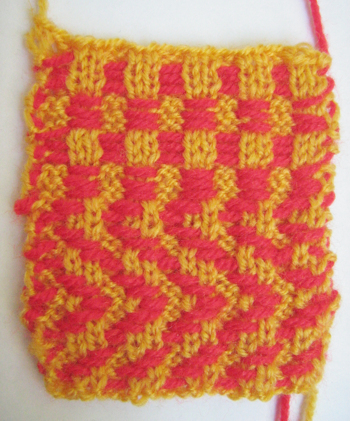
Then I wanted to know whether it works with two colours, too.
I think it does ;-))

The item gets however quite thick because of the many yarns.
Besides I’m sure that you can make the whole thing much neater ;-)
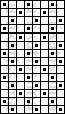
 So, that is the two-colour pattern.
A square filled with a filled square (eehm…) means: ‘dark blue thread on the front side of the item’, a square filled with an empty square means: ‘light blue thread on the front side of the item’, an empty square means: ‘all extra threads on the back side of the item’.
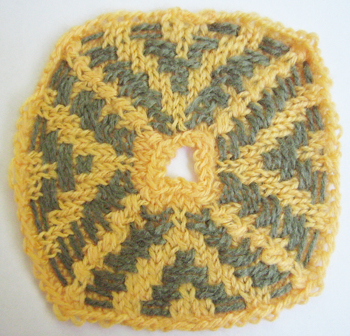
In the end I just played around with an extra: I knitted the (hmpf!) square from outside to inside in kitchener stitch by knitting three stitches together in the corners in every second row.
I carried the gray extra thread that I laid on the front side every second row shifted for one stitch.
Unfortunately I blocked the square made from acrylic yarn too hot, that ‘s why I can’t get it square anymore ;-(
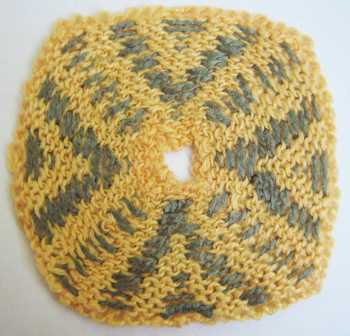
Here you can see the back side of the square.
The pattern is inverted and look also nice.
What I want to try next:
Links:
Short Description ‘Knit-woven Effects’
Photos of machine knit woven pieces (with lace knitting)
Photos of machine knit woven pieces
A short movie about the technique that she uses there to weave in fur yarn => look there for ‘Hand knit-weave technique’
Meine kleine Buchkritik – My little book review: Kathleen Kinder, ‘The technique of Knitweave’) (German and English): actually I refer to the pictures because the reviewed book is about machine knit weave
Actually I don’t want to talk only about Sashiko embroidery but about Sashiko embroidery on paper – I just prefer to embroider on paper ;-))
I discovered Sashiko embroidery one day when surfing the internet and found the results just beautiful!
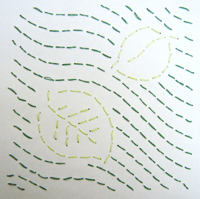
The basic principle (as far as I understood) is that Sashiko embroidery is mostly a shape filling embroidery and the lines are worked as ‘dashed lines’ where the spaces between the dashes are about half as long as the dashes themselves (simply check the tutorials (for ‘real’ Sashiko embroidery) in the links, they explained it better).
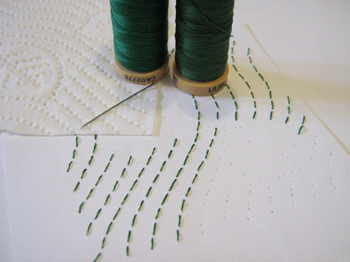
Then I saw one day that our toilet paper (top left on the picture) doesn’t only have a nice pattern but that I can use the pressure points for a Sashiko embroidery by using alternately the left and the right side of the points as needle entry points.
Therefore I trace-pricked the pattern on paper (bottom right on the picture) and embroidered it in two colours.
I find that you can’t see any more on the result that it is made by ‘cheating’ from toilet paper ;-))
 Here a look at the backside.
I will glue it on a card and send as a greeting card.
To people who use different toilet paper ;-))

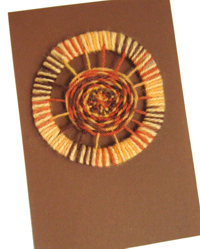
Recently I needed a card for a man which had to show the colours wine red and gold.
What is more I wanted it simple yet elegant and I think that it worked out ;-))
(Click the picture to get an enlarged view.)
 The pattern shows inside, too.
Because I didn’t like the writing to be directly on the wine red I put a crème coloured paper in.
 You can click the thumbnail of the template to download the enlarged template. The template is about 10 cm (appr. 4 inches), if you like to have a different size you will have to adapt the print size.
Simply lay the template on your card and prick all holes where you want to thread the yarn through (there are several possibilities, just try it).
Then weave in the thread.
Note: If you use an overlong thread you only get a thread tangle.
That’s why I worked in rings that I finished one by one.
You can find the technique that I used to thread the yarn through the hole in the entry Starburst Card.
I finished the ends of the threads on the backside as invisible as possible by laying them side by side and glueing them on.
In case that the backside of your card doesn’t look nice you can glue on a different coloured paper on both sides, that looks very good and conceals all imperfections.
Links:
Here at unikatissima:
Starburst Card: I show there how I weave the thread through the holes, here I did it the same way
Entries with the tags ‘paper’ and ’embroidery’
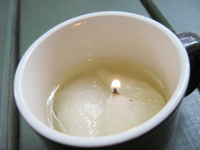
On the photo you see an oil lamp from an espresso cup, plain, cheap cooking oil and cotton. On the page with the instruction there are more but I always wanted to try this one.
And I learned a lot:

But: I always have to keep an eye on it: At the end when the oil was nearly burned the cotton began to burn and the cup was very, very hot and totally sooted.
Fortunately it didn’t break.
Part of the soot was ‘only smudgy’ and I could wipe it away, but part of it was kind of burned in and it took me the time of a whole motion picture (and lots of force!) to get the cup clean again.
Anyhow I will do this again because it is reasonably priced and beautiful.
Perhaps I will drip some drops of essential oil into, but first I must find out what puts off midges ;-)
After I presented Jewelry for the Garden some time ago and yesterday the Tomato Tube Leaves I want to present today three more garden decorations from joghurt cup lids and acrylic yarn.
Instruction for the 1. decoration, the 2. decoration, the 3. decoration
 As you can see the ornament can be used for a greeting card as well ;-)
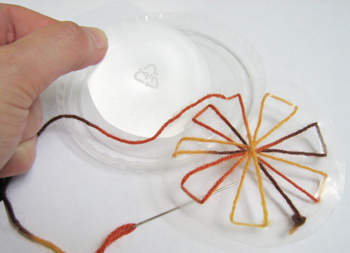
I used a transparent joghurt cup lid (from a 500g joghurt cup) and variegated acrylic yarn.
Additionally you will need a darning needle.
 Cut a broad rim from the lid and prick 16 holes.
Then weave a spiderweb through the pre-pricked holes.
You can click the thumbnail of the template to download the enlarged template. The template is about 10 cm (appr. 4 inches), if your lid size is different you will possibly have to adapt the print size.

Weave the spiderweb: always over and under the threads, as long as you like.

Subsequently I complemented the yarn with another with a matching colour and wrapped both around the broad plastic rim.
The crochet hook made the work sometimes easier but isn’t necessary.
I glued the ornament onto a card but you can attach it to a wooden stick, e.g. a kebab skewer, too, and put into a flower box or a flower bed.
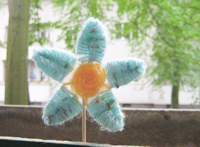 I made this ornament with a lid from the same joghurt and with acrylic yarn, also.
 Cut your joghurt cup lid following this template (click the thumbnail of the template to download the enlarged template. The template is about 10 cm (appr. 4 inches), if your lid size is different you will possibly have to adapt the print size.)
You must also cut the black lines in the petals, but they must not reach the edge.
Begin ‘in’ a petal and weave both wings of the petal in eights until they are completely covered in yarn (from the center to the left and back to the center, from the center to the right and back to the center, repeat).

Then prick a hole in the center of the flower and weave a net (in a contrasting colour) (see photo).
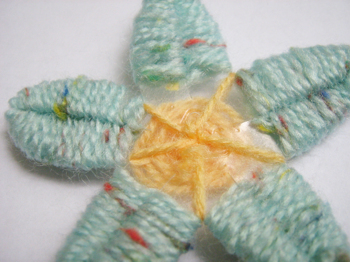
Weave the yarn around the threads, always over and under the thread.
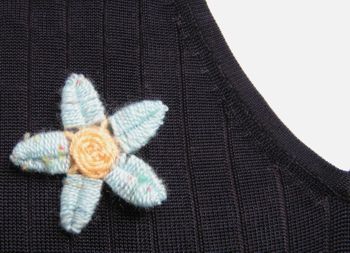
If you use the ornament as a pin or for a greeting card it is enough to weave only one side of the flower, otherwise you must work on both sides.
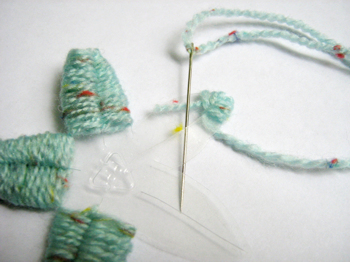
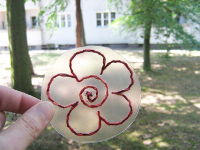 Of course this ornament has been made with a lid from the same joghurt and with acrylic yarn ;-)
This time a darning needle is absolutely necessary.
 Cut and prick your joghurt cup lid following this template (click the thumbnail of the template to download the enlarged template. The template is about 10 cm (appr. 4 inches), if your lid size is different you will possibly have to adapt the print size.)
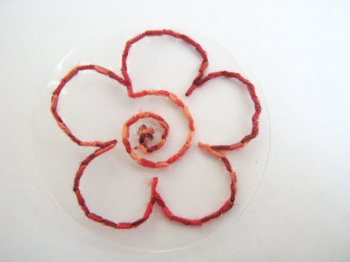
Simply embroider the pattern: always in and out and if you like, back again.
Links:
Here at unikatissima:
Jewelry for the Garden
Tomato Tube Leaves
Here on this page:
Instruction for the 1. decoration
Instruction for the 2. decoration
Instruction for the 3. decoration
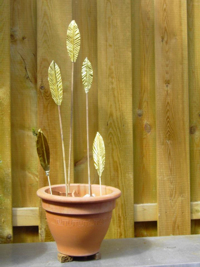
Don’t those golden leaves look great?
A dear friend made them from (admittedly mustard ;-)) tubes and allowed me to show here how to make them.
Many thanks again!
That’s what you do:
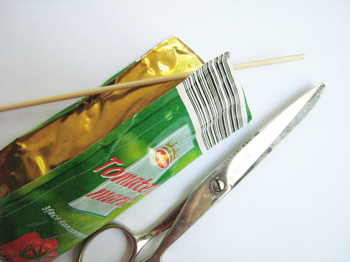
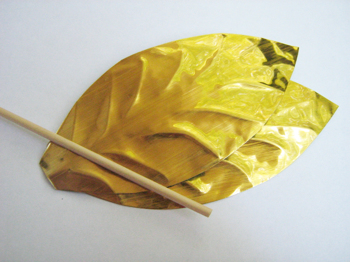
You need a (clean and empty! ;-)) tube with golden internal coating, scissors and a wooden stick, e.g. a kebab skewer.
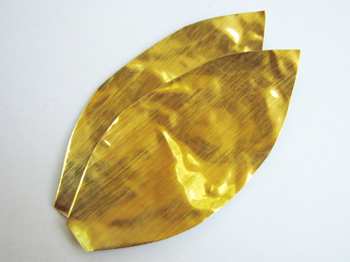
I folded up the tube which was cut open on three sides and cut out two equal leaves.
First I flattened the leaves slightly and then I put the kebab skewer in and pressed them lightly until the midrib of the leaf begun to show.
Then I scratched the leaf ribs with the back of my kebab skewer from the backside of every leaf.
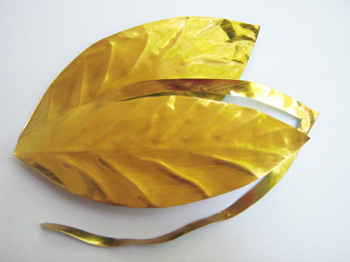
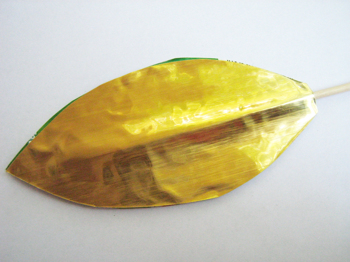
Afterwards I reduced one leaf by cutting away an edge of about 3 mm.

I put both leaves on top of one another and scratched the outline of the smaller leaf slightly with the tip of my kebab skewer into the larger leaf.
Then I cut the edge of the larger leaf from the rim to the scratched line of the smaller leaf about every 5 mm.

I put both leaves on top of one another with the golden sites outwards and folded back the sections.
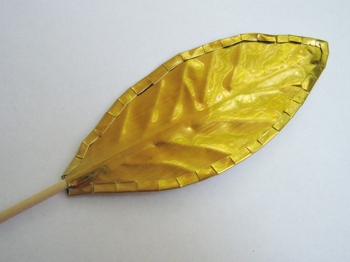
At the end I stuck the kebab skewer between the leaves.
You can stuck it in also before folding back the sections, just as you like it.
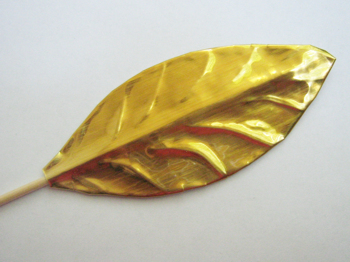
My friend additionally glued on the kebab skewer but we both don’t know if this is necessary ;-))
Have much fun decorating your flower boxes and garden flower beds :)