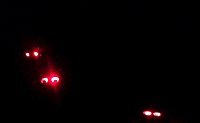
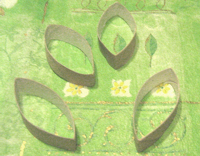
Well, it’s not sooo long until Halloween anymore and you may want to test the eyes in the bushes before :))
Links:
31 Days of Halloween – Eyes in the Bushes
via: cut eyes out of toilet paper rolls…
…compilation of tutorials
Well, it’s not sooo long until Halloween anymore and you may want to test the eyes in the bushes before :))
Links:
31 Days of Halloween – Eyes in the Bushes
via: cut eyes out of toilet paper rolls…

I like this face from a toilet paper roll very much!
It’s very easy to distort the toilet paper roll, but I found it absolutely not easy to make a ‘real’ face.
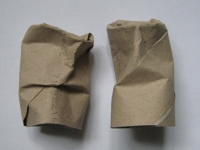 My try only went this far ;-))
Thank you, Asta, for the hint :)
Links:
via the page of Junior Fritz Jacquet you can get a PDF file with pictures of (among other things) more faces (English)
=> click’ the British flag bottom left

This toilet paper roll ornament was actually made for Christmas, but I find it also beautiful for spring with these merry colours :)
Links:
Toilet Paper Roll Ornament (Series 3 – SITUATION CHRISTMAS ORNAMENT-ATION #4)
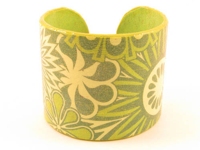
Every time I see these bracelets I’m thrilled
I didn’t like her ‘old ones’ very much, where she simply glued paper on the cardboard tubes because I find them too massive, but I find the ones with the opening really great!
I still must have such cardboard tubes somewhere, then I only need some wall paper rests or other colourful paper.
Perhaps the paper from the travel brochure? ;-)
Links:
More cardboard cuffs, better design!
The ‘old ones’ (Cardboard cuff bracelet)
Here at unikatissima:
Paper Shopping Bag
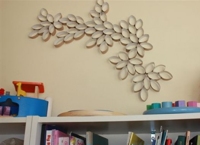
If you haven’t decorated your walls already with the yarn wall art you may want to try the paper rolls wall art ;-)
And if it’s not quite your cup of tea, you can make from your toilet paper rolls e.g. simple napkin holders, a cord holder, recycled gift tags and/or a hairpin lace loom ;-))
Links:
DIY : paper rolls wall art
Here at unikatissima:
 Yarn Wall Art
Simple Napkin Holders
Cord Holder
Recycled Gift Tags
Self-made Hairpin Lace Loom

Do the cords lie around everywhere? Simply cram them into a toilet paper cardboard roll on the wall ;-)))
I find this idea simply amazing!
And as creative as we are we surely can embellish the tube ;-))
By the way, I have more things that can be done with cardboard tubes ;-))
Links:
Cord roll
Here at unikatissima:
Entries containing the word ‘cardboard tube’
The gift tags on the photo aren’t ready yet: I simply can’t decide with which yarn I should wrap them.
But I find the idea really great: flatten the cardboard tube, cut it in strips and wrap the pieces with yarn.
I think that it could look beautiful, too, when wrapped in a piece of beautiful polymer clay and worn as necklace, earring or pin.
Hm.
When reading the instructions for the gift tags I had to think somehow at the surprise ball gifts ;-)
But she had other ideas, too, about what to make with these paper shapes, namely a cute tealight and an interesting lamp decoration.
I presented before entries about recycled cardboard tubes here in this blog, namely the beaded amulet bag, the plaster photo holder and the knitting loom from a plastic bottle.
But there the cardboard tube was ‘only’ a tool.
Links:
recycling project no. 19 – yarn gift tag
recycle project no. 12 – tealight decoration
recycle project no. 16 – hurricane cover
Here at unikatissima:
Surprise Ball Gifts
Beaded Amulet Bag
Plaster Photo Holder
Knitting Loom from Plastic Bottle
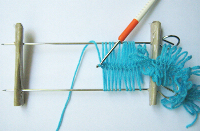
I found two tutorials on how to make a hairpin lace loom (see links below) and because I hadn’t the appropriate material at hand (in fact that’s strange seeing all the stuff I have lying here about ;-)) I did it a little different:
I took two toilet paper tubes, cut them lengthwise, rolled them up strongly and taped them all around.
Then I pricked two metal kebeb skewers through those thick cardboard rolls: my hairpin lace loom was done!
;-)
At last I could give hairpin lace a try and it – worked.
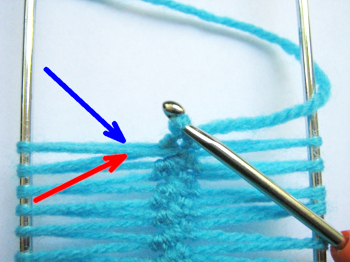
That is to say that I haven’t read the hairpin lace instruction at stichdiva thoroughly(!) and therefore it didn’t work in the beginning.
They write ‘Insert hook under thread of topmost loop’, but for me it isn’t the topmost thread (blue arrow) but the foremost thread (red arrow).
After I took the foremost thread everything worked fine.
At the moment I don’t have the time for it but in future I will play around with hairpin lace :)
Links:
Instructions for self-made hairpin lace looms:
 Instruction at ehow – from metal
there you can find further down (Resources) links to hair pin lace tutorials
Instruction at Little Projects – from bamboo skewers and hot glue sticks
via: DIY Hairpin Lace Loom: the link isn’t available no more.
Tutorial for base hairpin lace at stitchdiva
Google search result for ‘hair pin lace’
Google image search result for ‘hair pin lace’
Google search result for ‘Gabelhäkelei’
Google image search result for ‘Gabelhäkelei’
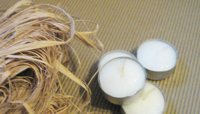
Ok, slowly the days become lighter but you can always do with a nice tea light holder.
In the instruction on how to make a tea light holder form corrugated cardboard they are meant for Halloween, but by simply selecting other colours you can actually fit them to everything.
Because you have to wrap the tea light several times I think that they are quite robust.
I already have prepared my stuff ;-)