Leftover Needlework

Leftover Needlework

I have a lot of yarn and thread rests, some of them quite short and I had no idea, what to do with them (except Freeform needlework as a matter of course ;-)).
And then one day I found an article about the ‘Magic ball’ an article about the ‘Magic ball’ and decided that this is it ;-)
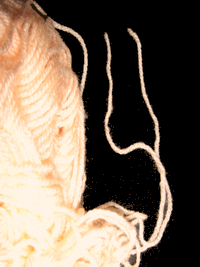
In the bottom line it’s nothing else then taking your short threads and knotting them together (with a weaver’s knot e.g.) to get a long enough thread to knit or crochet or what ever you want to do.
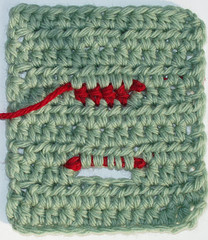
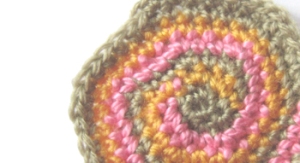
On the photo you see three tests I did: On the item above I simply knotted different strings into a long thread and crocheted. It were quite short strings.
For the item below left I took two skeins of yarn, one green and one rose. I knitted with two threads and knotted them so, that I began working with 2 greens, then a green and a rose, then 2 rose, a green and a rose again and back to 2 greens. That way I got a kind of blend between the two colours.
The item below right is made in the same way, but with one light green and one dark green.

I’m sure that I will get back to this technique again.


Links:
Make your own magic using knotted yarn leftovers: the link isn’t available no more.

At unikatissima’s:
Freeform Needlework
Weaver’s Knot

Fixing Crochet Mistakes

Fixing Crochet Mistakes

I crochet a lot and I’m always making mistakes ;-)
In the case of buttonholes or pocket slots appearing ‘magically’ at the wrong place, I found very valuable hints on what to do.
This is one of the few mistakes I haven’t made yet.
Mostly because I don’t crochet neither buttonholes nor pockets ;-)
Perhaps I should give it a try? ;-))


Links:
Wait, how did that buttonhole get there?

Bicycle Bottle Holder

Bicycle Bottle Holder

One day my friend asked me, if I have an idea how best to attach his water bottle to his bicycle. I promised him to make him a bottle holder and that’s it: It consists of a cardboard cylinder with bottom and a wrap crocheted from simple package string. I made two cords from the same package string to tie it somewhere to the bicycle.

And that’s how to do it:

  1. Cut a rectangle from cardboard.
    One side must be long enough to go around the bottle plus allowance, the other must be high enough, so that it holds the bottle safely.
  2. If you want the cardboard container to be (quite) waterproof, tape the inside with tape.
    Note: I used clear package tape.
  3. Wrap the cardboard around the bottle and wrap with long strips of tape.
    Hint: If it has to be waterproof, tape the whole cylinder.
    Hint: To make sure, that the cardboard container is not to tight around the bottle, I wrapped the bottle in several layers of old newspapers and wrapped the cardboard around the ‘thickened’ bottle.
  4. Cut a circle from cardboard, optionally tape the to-be inside with tape, too.
  5. Attach the circle with amply applied package tape to the bottom of your cardboard cylinder.
  6. Then you can create the outer container.
    Note: I crocheted it from package string by first crocheting a circle and then simply working straight up. ‘On the way’ I worked some thread eyes for the cords. The cords themselves were made from the same material.
    Hint: It should be easy enough to sew the outer container from a fabric matching your bicycle colours.
  7. The inner cardboard container and the outer crocheted container.
    Bicycle Bottle Holder Bicycle Bottle Holder


    Links:
    If a bicycle bottle holder isn’t enough for you, try the Bicycle Handlebar Bag.

    Making Any Sized Crochet Circles (English)
    Häkeln lernen: Runden und Spiralen (German)

    How to make Twisted Cord (English)
    Kordel drehen (German)

YoYo Pin

YoYo Pin

I like yoyo’s, but only recently I tried to make one. And I find it cute.
It is made from shiny polyester fabric and embellished with a little crocheted flower and some embroidered beads (I hate to have polyester on my skin, but I like it for pins and the like, because it is so shiny).


Links:
Yoyo Projects (with explaining pictures)
How to make a Yoyo (with explaining pictures)

The links don’t work anymore, you can find the information here now:
Yoyo Projects (with explaining pictures)
How to make a Yoyo (with explaining pictures)

Crazy Daisies

Crazy Daisies - Wickelblumen

While searching for something else I found a lot of instructions and tips about Crazy Daisies and had to try them immediately ;-)

As you can see on the photo, my attempt on winding daisies on my own daisy loom worked out very well.
I cut the loom (the purple item on the photo) from thick cardboard. I think that the ice cream lid loom is better, because plastic won’t loose its shape so easily, but for just a couple flowers cardboard is fine.
At my first flowers I just made a very simple backstich center, but even so I find those little flowers stunning ;-)
The dark red flower is a daisy with an open center, but I made it in a different way: I didn’t wind the thread to the other side of my selfmade cardboard loom but to another notch (always the fourth notch in place of the sixth, I think. I didn’t write it down, because I don’t like it so much).
I’m planning to make something like the shrug with a lot of flowers and a simple crochet edging.
Eventually. ;-)


Links:
(all in English, but with explaining pictures and photos)
Instructions and tips about Crazy Daisies

For example:
Round ice cream lid daisy loom
Instructions on how to wind daisies
How to make a backstich center daisy
How to make a open center daisy
Simple crochet edging

Stole, Shrug, Handbag and Three Different Shapes on the Crazy Daisy Winder (from 1945)

Lacy Crochet Scarves From Edgings

Lacy Crochet Scarves From Edgings

I love to crochet lacy scarves, but I don’t like to always work the same pattern.
Therefore I was looking for some patterns for such lacy crochet scarves and didn’t find what I was searching for.
Then an idea stroke: What is a lacy crochet scarf but two edgings back-to-back?


Lacy Crochet Scarves From Edgings
On the first photo you see one of my scarves made from a handkerchief edging from a magazine I bought. I used acrylic yarn. The second one is from a towel edging from another book. And for the third I first crocheted a middle strip which I surrounded afterwards by a self designed edging.


Lacy Crochet Scarves From Edgings
Addendum: By the way, I found this idea so clever, that I entered this post to the This Thursday is all about… challenge 3 Clearly Clever ;-))
Therefore Tracey’s comment ;-)


Links:
Crocheted Edging Links
Crochet Pattern Central: Free Edging Crochet Pattern Links
crochet.about.comSearch results for ‘edging’

Detangling Yarns

Detangling Yarns

The original title of this tutorial is ‘Knitting from both ends without going mad’ which is very to the point ;-)
I mostly work with the yarn end that sits in the skein to prevent the skein to roll all over, but then often the yarn entangles so much, that I nearly can’t work anymore.
This tutorial was really a relief ;-)


Links:
Knitting from both ends without going mad (with explaining photos)

Rose Bag

Rose Bag

One day I found this tutorial on how to make a Rose bag – stunning!
I’d love to crochet it one day, but up until now I didn’t get further than the Irish rose on the photo ;-)
(I know that the Rose bag isn’t done as Irish Rose, but it looks like ;-))


Links:
Tutorial on how to make a Rose bag

Irish Rose:
Two-Layer Irish Crochet Rose Free Pattern

Translations of Crochet Terms

Crochet Spiral

Crochet Spiral

Sometimes you want to crochet not only a spiral, but a multicoloured spiral (beautiful in Freeform Needlework!).
I once found even two tutorials for crochet spirals, but the links don’t work anymore (I put them to the Links below in case you like to try them).
But because I didn’t found no more instructions I wrote a tutorial myself based on the previously found tutorials:

You will need 3 skeins of yarn in matching gauges.

Work in spirals, though NEVER JOIN!

st = stitch
sc = single crochet

1st row: work 6 sc on magic ring
2nd row: work 2 sc in each st = double each st = 12 st
work the 1st 4 st in colour A, the 2nd 4 st in colour B and the 3rd 4 st in colour C
3rd row: work * 1 sc, 2 sc in next st *, repeat from * to * = double each 2nd st = 18 st
work the 1st 6 st in colour A, the 2nd 6 st in colour B and the 3rd 6 st in colour C
4th row: work * 1 sc, 1 sc, 2 sc in next st *, repeat from * to * = double each 3rd st = 24 st
work the 1st 8 st in colour A, the 2nd 8 st in colour B and the 3rd 8 st in colour C
cont.


(Click picture to enlarge)
Crochet Spiral Hints:

  • At the colour change pull the loop of the ‘old’ colour into a large loop that you lay aside until you pick it up for the next round (see detail photo with loops).
  • The spiral gets hexagonal when worked this way. If you want to avoid this, move the place where you work two stitches in one stitch a little around (see photo above).


(Click picture to enlarge)
Crochet Spiral


Links:
Both links didn’t work when I tried them:
Crochet Spiral
Crochet Spiral


Magic ring
(Google results)
The Magic Adjustable Ring: A Better Way to Begin Crochet in the Round: very good illustrated instruction
Häkeln lernen: Der Fadenring (German)

Here at unikatissima:
Freeform Needlework

Self-made Crochet Hooks And Knitting Needles

Self-made crochet hook and knitting needles

Once I wanted to have a really big crochet hook and knitting needles and after I found tutorials on how to make them (see links below), I made myself some.
In fact they are so big that it is quite difficult to work with them ;-)
I use them very rarely – but if necessary, I can ;-)


Links:
Making Crochet Hooks:
Making Crochet Hooks from Chopsticks (with explaining pictures)
Make your own straight hook (with explaining pictures)

Making Knitting Needles:
Chopstick/dowel knitting needle tutorial