A great box, isn’t it?
I really want to fold it – but I must get some new printer toner before I can ;-(
Links:
Folded Tiki Box (Tiki Box)
…compilation of tutorials
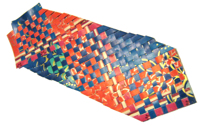
A great box, isn’t it?
I really want to fold it – but I must get some new printer toner before I can ;-(
Links:
Folded Tiki Box (Tiki Box)

A cute tealight again: the Fortune boat lamp.
I don’t have the right paper yet, but I will make it for a beautiful summer evening on our balcony :)
Links:
Fortune Boat Lamp
based on the Fortune Boats
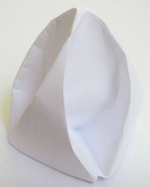
Well, origami is wonderful, but I find some of the most fascinating items those with curved creases.
I tried a first, beautiful example – and as you can see on the picture I have to practice a lot.
But why not? ;-)
Links:
At The Institute For Figuring: Curved Crease Origami – You can find two PDF files there at the end
Here at unikatissima:
Other entries with links to The Institute For Figuring:
 TED Talk: Nature, Crochet and Geometry
Beaded Hyperbolic Planes
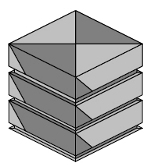
I like to fold Origami boxes but these are even better: you can stack them.
Once I folded them and used them for little beads but by now I have thrown them away.
Actually it’s a pity.
Links:
Mike’s Origami – Origami Diagram Links – Boxes and Containers => click ‘Tower Boxes’ (PDF, ca. 82 KB)
Here at unikatissima:
Entries with the tag ‘box’
Entries with the tag ‘origami’
Folded boxes:
Paper Matchbox Slide Box
Curved Box not only for an Advent Calendar

I found an instruction for a cute notebook that is simply made with folded paper as pages and playing cards as cover.
That could be a nice quick small present.
Recently I re-discoverd the website of Lisa Vollrath whose tutorials I always found really great.
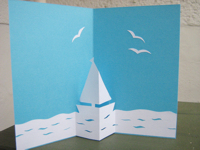
When I saw her ‘A Simple Tabbed Pop-Up’ I wanted to try it immediately.
But then it started: No, I don’t want to make an Eiffelturm, but something else. But what? Somebody wrote something about sail boats in the comments.
Ok, good idea.
Ehm, the toner of my printer won’t suffice to print something.
Hmm, Lisa said that actually it doesn’t matter how large the tabs are…
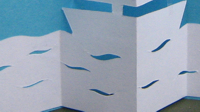
Thus I took an A4 paper horizontally and my Xacto knife and startet to cut a sail boat and the sea.
I find my card for a try on the spur of the moment quite nice, but I haven’t decided yet what to put on the front side ;-)
Links:
At Go Make Something: A Simple Tabbed Pop-Up
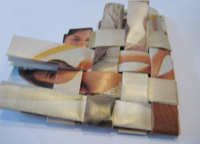
I really liked the woven magazine coasters and the beginning was in fact easy to do.
But for whatever reason I haven’t been able to finish them properly – clumsy fingers or something like that ;-(
But one day…
;-)

I found the umpteenth instruction on how to cut a snowflake from paper, but this time the snowflake looked so much more beautiful than usually.
I made immediately a card with non winterly coloured advertising junk mail paper :)
Links:
Fidgety Fingers: Magazine Manifesto – Paper Snow
Here at unikatissima: Kirigami Flower
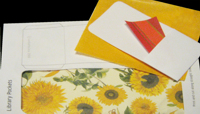
I found a tutorial on how to make a wonderful library pocket book.
Though our library doesn’t have such library pockets and I don’t feel like buying them in internet.
That is why I designed some pockets myself. If you like you can download my library pocket template (link see below).
I’m planning to make a book where the pockets are made from patterned paper, the flower paper on the photo e.g.
For that purpose I will print the template, glue the paper so, that it is patterned on both sides and then cut the pockets from the template.
And then I will begin to embellish ;-))
Links:
Library Pocket Book
Here at unikatissima: unikatissima’s Library Pocket Template (PDF – ca. 80 KB)
A long time ago I found a tutorial on how to make bookmarks with Ugandan Weaving, but the site doesn’t exist any more and I couldn’t find it in internet.
Therefore I wrote something myself.
That’s what you do:
 First of all you must cut the paper stripes.
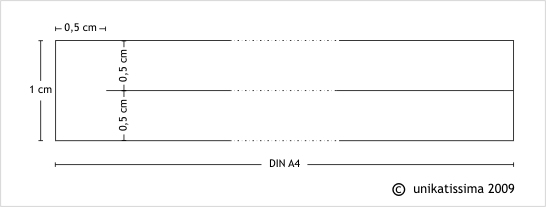
Take two coloured DIN A4 sheets and cut them in stripes of 1 cm.
Slit them in the middle, but let at one side a little piece (0,5 cm) unslit so that the stripes don’t fall apart.
You can see this best on diagram 1 (click to enlarge).
 Then lay the stripes side by side and weave them as seen in diagram 2 (click to enlarge).
I sketched it as if there were 4 colours, that looks also nice.
 When all stripes are woven fold the outer stripes back and weave on (see diagram 3, click to enlarge).
Continue until you’re satisfied.
You can see on the photo on top that I haven’t read the instruction thoroughly: I didn’t take stripes of 1 cm but much broader ones, although I slit them every 0,5 cm, too.
The disadvantage is, that the stripes are pushed apart and therefore the beginning (left of picture) doesn’t look very nice (although I took the photo so that it’s not to be seen ;-)).
When you take the 1 cm stripes which are slit once this effect doesn’t occur.
I taped the ends together with clear tape.
And I made the coloured papers by glueing two Christmas gift wrap papers together :)

Links:
Original site where I found the tutorial for Ugandan Weaving. When I tried it, it didn’t exist any more.
The site has been saved by webarchive.org, but without the (important!) diagrams: site without diagrams (note: very long loading time).