I really liked the woven magazine coasters and the beginning was in fact easy to do.
But for whatever reason I haven’t been able to finish them properly – clumsy fingers or something like that ;-(
But one day…
;-)
…compilation of tutorials
I really liked the woven magazine coasters and the beginning was in fact easy to do.
But for whatever reason I haven’t been able to finish them properly – clumsy fingers or something like that ;-(
But one day…
;-)

I found the umpteenth instruction on how to cut a snowflake from paper, but this time the snowflake looked so much more beautiful than usually.
I made immediately a card with non winterly coloured advertising junk mail paper :)
Links:
Fidgety Fingers: Magazine Manifesto – Paper Snow
Here at unikatissima: Kirigami Flower
Once I found the instruction on how to preserve leaves with beeswax. This way you can make the leaves for float on water.
I really liked the idea, but it is winter now and I thought that you can do the same with paper, similar to the beeswax collage.
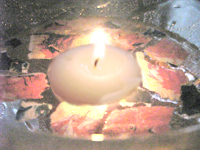
Then I thought further and found out, that paper floats without wax also (goes muuuuch swifter! ;-))).
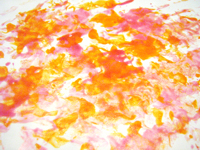
On the first photo you see a glass bowl with a simple tea light, the paper snippets are from some advertising junk mail.
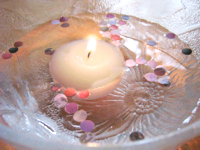 For this photo I thought even further (which wasn’t easy ;-)) and spread on some confetti from the hole puncher.
I like it!
The only problem was the disposal when I wanted to throw away the confetti. I couldn’t fish them out without problems. Therefore I put a piece of tissue paper onto the gutter of my kitchen sink so that no confetti could pass through, and poured slowly the bowl on the tissue paper (if you pour too fast the tissue paper can slip). The water went through and the confetti assembled onto the tissue paper, so that I simply had to throw away the tissue paper with the confetti.
Links:
Preserving Leaves with Beeswax for Floating on Water
Here at unikatissima: Beeswax Collage
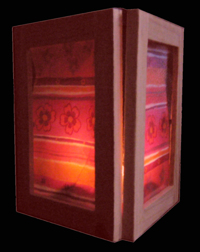
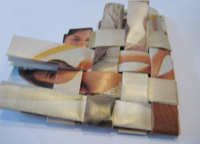
When there comes the time again where you can sit on your patio and dine with friends (ok, ok, it will still take some time, but a woman can dream ;-)), the candle lit photo stands can make a romantic atmosphere.
In the instruction they print their own photos on vellum and glue them on, I preferred my favourite gift wrap.
Besides you should also be able to use the topmost layer of the used paper napkins (possibly glued on vellum), then everything matches even better.
Links:
Photo Centerpiece
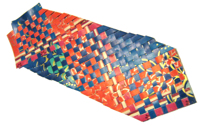
A long time ago I found a tutorial on how to make bookmarks with Ugandan Weaving, but the site doesn’t exist any more and I couldn’t find it in internet.
Therefore I wrote something myself.
That’s what you do:
 First of all you must cut the paper stripes.
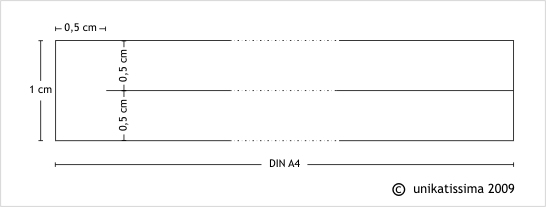
Take two coloured DIN A4 sheets and cut them in stripes of 1 cm.
Slit them in the middle, but let at one side a little piece (0,5 cm) unslit so that the stripes don’t fall apart.
You can see this best on diagram 1 (click to enlarge).
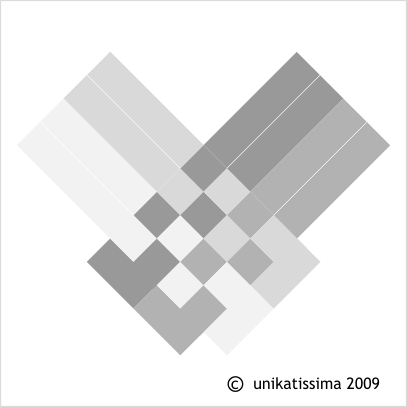 Then lay the stripes side by side and weave them as seen in diagram 2 (click to enlarge).
I sketched it as if there were 4 colours, that looks also nice.
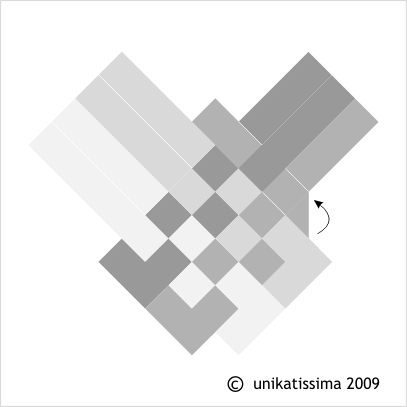 When all stripes are woven fold the outer stripes back and weave on (see diagram 3, click to enlarge).
Continue until you’re satisfied.
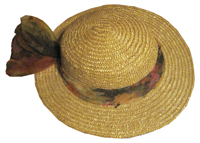
You can see on the photo on top that I haven’t read the instruction thoroughly: I didn’t take stripes of 1 cm but much broader ones, although I slit them every 0,5 cm, too.
The disadvantage is, that the stripes are pushed apart and therefore the beginning (left of picture) doesn’t look very nice (although I took the photo so that it’s not to be seen ;-)).
When you take the 1 cm stripes which are slit once this effect doesn’t occur.
I taped the ends together with clear tape.
And I made the coloured papers by glueing two Christmas gift wrap papers together :)

Links:
Original site where I found the tutorial for Ugandan Weaving. When I tried it, it didn’t exist any more.
The site has been saved by webarchive.org, but without the (important!) diagrams: site without diagrams (note: very long loading time).
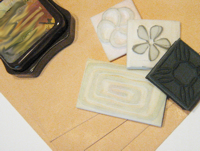
A long time ago I found an instruction for encaustic for poor.
On the photo you see one of the tries I made – I like it ;-))
I think that I will have to do it once more.
Links:
Encaustic für Arme (German)
English: Read the section ‘Ironing Crayon’. On this site you find more ideas for melted crayons.
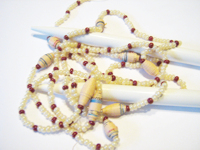
I found at knitty the instruction for the knitted bead cuff ‘Bauble’ and really liked it.
Therefore I wanted to knit at least a bit to see how it looks.
Because I don’t have any bigger beads at the moment I used some left over paper beads.
But I didn’t manage to knit the bead string at all.
I really must try it again when I’m a little more untroubled because I really find Bauble beautiful!
Here at unikatissima: Paper Beads
I found an instruction on how to make easy gift bags from envelopes. The result looks really nice and I already arranged my envelopes and stamps…
Links:
Very Easy Gift Bagalopes
Here at unikatissima:
Eraser Stamps
More entries with the tag ‘stamping’

People who craft a lot with paper often have many interesting papers laying around, but mostly scrap you can only make cards from.
But now I found a tutorial on how to make mini recycle bin books, which I find great!
Soon I will have to comb through my piles ;-))
Links:
Mini Recycle Bin Books
If you want to make Altered Books or Artist Books, or maybe book purses, or you want possibly remove individual book pages to make a beautiful card, then the tutorial on how to easily remove pages from books may be helpful: you moist a thread, lay it into the book at the place where you want to remove a page, close the book firmly, so that the moisture can enter the paper and then you can tear the paper cleanly.
It’s the same principle as for tearing paper, but here the moist line is certainly straight and much thinner.
Ingenious!
Links:
At instructables: How to easily and cleanly remove pages from books
Here at unikatissima:
Artist Book
Notebook Purse
Tearing Paper