![]()
I find those beads soo beautiful and can easily imagine them in other colour combinations!
One day…
Sigh.
;-)
…compilation of tutorials
![]()
I find those beads soo beautiful and can easily imagine them in other colour combinations!
One day…
Sigh.
;-)
The gift tags on the photo aren’t ready yet: I simply can’t decide with which yarn I should wrap them.
But I find the idea really great: flatten the cardboard tube, cut it in strips and wrap the pieces with yarn.
I think that it could look beautiful, too, when wrapped in a piece of beautiful polymer clay and worn as necklace, earring or pin.
Hm.
When reading the instructions for the gift tags I had to think somehow at the surprise ball gifts ;-)
But she had other ideas, too, about what to make with these paper shapes, namely a cute tealight and an interesting lamp decoration.
I presented before entries about recycled cardboard tubes here in this blog, namely the beaded amulet bag, the plaster photo holder and the knitting loom from a plastic bottle.
But there the cardboard tube was ‘only’ a tool.
Links:
recycling project no. 19 – yarn gift tag
recycle project no. 12 – tealight decoration
recycle project no. 16 – hurricane cover
Here at unikatissima:
Surprise Ball Gifts
Beaded Amulet Bag
Plaster Photo Holder
Knitting Loom from Plastic Bottle
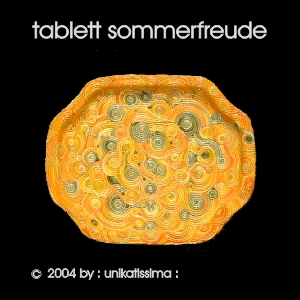
When working with polymer clay there is a technique called ‘Filigree’ where you press long ‘noodles’ from polymer clay to be laid in (e.g.) spirals.
That’s what I did on my Tray Sommerfreude (see photo) and the Coasters Sommerfreude: I had a lot of fun making these!
Usually the strands of polymer clay are made with a so-called clay gun but I found an instruction which uses successfully a garlic press (the garlic press may not be used for food afterwards!).
If you feel like working with filigree then take a look at the links where I listed some tutorials.
And if you don’t feel like working with filigree then take a look at the Google image search results, I’m sure that you will change your mind ;-))
Links:
Making Clay Strands With a Garlic Press
Tutorials about Filigree:
 Beaded Filigree – that is the page succeeding ‘Noodling’ polymer clay with a garlic press
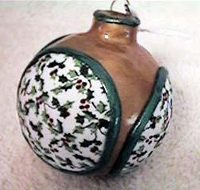
Blended Filigree Egg
Rainbow Filigree Lesson
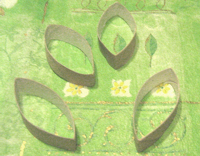
Fold Over Beads – Polymer Clay Filigree Bead Project – here she doesn’t cover items in filigree but makes crescent-shaped beads from the polymer clay spirals
By the way all tutorials present polymer clay strands in gradient colours, the first tutorial also talks about single-colured strands.
Google image search result ‘polymer clay filigree’
Google search result ‘polymer clay filigree’
Google image search result ‘clay gun’
Here at unikatissima:
Tray Sommerfreude
Coasters Sommerfreude
I always liked those beads and they are not so difficult to make – but I haven’t yet managed to make them ;-)
Links:
Feather Beads
One thing I want to try one day, too, is to apply fabric on polymer clay.
Sigh.
;-)
Links:
Fabric on Polymer Clay (Fun with Fabric)
Those buttons look great, don’t they? They are made to look like pieces of antique pottery and I find that they do.
But it’s ‘only’ polymer clay, acrylique paint and varnish to seal ;-))
I haven’t made them yet but I would like to ;-)
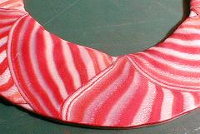
I find those zig-zag stripes soo great but I still haven’t made them.
When I see it lying there I always think that it would be a wonderful necklace…
But somehow it takes more and more a back seat on my “just do it”-list ;-)

Wow, an idea again that I really appreciate: take a phone book, roll it up and fix it with a ring of a nature what-so-ever and done is the card holder!
The silver coloured ring looks quite good, but I imagine that it would look as good when you wrap your card holder with wire, plastic, beautiful yarns or fabrics or when you slip a poymer clay ring over, the only thing to make sure is that you fix everything well.
And in place of the Yellow Pages you can use as well coloured ads or paper – neatly stacked – or books where you removed the cover.
Links:
Card Holder (Reusing Yellow pages) – they’re linking to another website but I didn’t find the Card Holder on the other web page
Here at unikatissima:
Entries with the tag ‘ring’
Entries with the tag ‘wire’
Entries with the tag ‘plastic’
Entries with the tag ‘books’
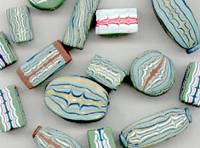
I made some nice necklaces from very narrow polymer clay beads where the bead colours are blended – and I wanted to present them now.
That’s what you do:
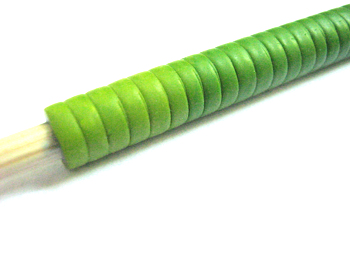
First make a Skinner Blend (a ploymer clay slab with a colour blend).
I blended it from light green to blue.
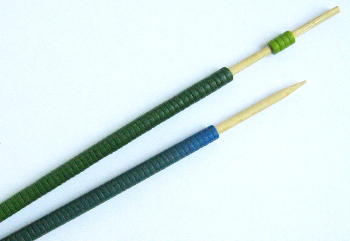
Cut the slab in stripes and wrap them around one or more kebab skewers – not too firm or you get problems taking them off, later.
Join the edges thoroughly and with care so that the beads won’t fall apart later.
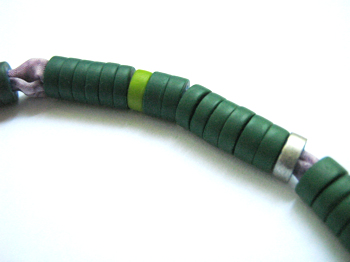
At the top of the photo you see a piece of light green polymer clay, that will become contrasting beads.
By the way: If you don’t have a pasta machine for the Skinner Blend (never use a pasta machine used for polymer clay for food again!) you can find hints on how you can manage without it via the links below.
Cut the wrapped slab with a small knife down to the skewer at regular intervals, I made my future beads about 3 mm wide.
Bake the polymer clay following the instructions and get the beads off the skewer(s) carefully.
On this photo you see my light green contrasting bead that I put between the others to make it look more interesting and you see a silver bead where I don’t remember how I coloured it.
I think that I used silver coloured metallic powder that I bought for some Mica shift projects.
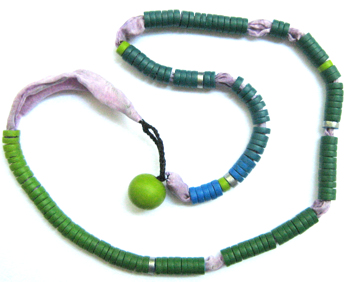
I threaded my beads on a self-dyed violet silk cord and made the clasp from a black braided band and a big, round light green bead.
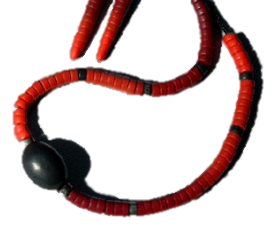
And that is a red necklace with Skinner Blend beads that I gave away – I’m sorry for the poor quality of the picture, when I took the photo at that time I didn’t know how to make good photos.
On both sides of the black central bead I let the colour blend go from light to dark red and loosened it up with narrow black beads.
The earrings are simply cones that I rounded at the top and that I carved slightly horizontally to make them match the necklace.
Links:
Skinner Blend
Don’t have a pasta machine?
Making A Jellyroll Cane Without A Pasta Machine
via: Glass Attic – Pasta machines – click on ‘No pasta machine?–other ways …guide rails’
Pasta Free Skinner Blend (Video)
Here at unikatissima:
Polymer Clay Mica Shift
Isn’t this a great idea?
A friend sent me the link to the blog where they knit with several ‘unorthodox’ materials – it’s worth a try, I find ;-)
Perhaps crocheting, too!?
By the way, you can knit with polymer clay, too, but unfortunately I didn’t find back the links except for some photos.
Links:
Knitted Plaster Impregnated Bandage and more (Knitting… not as you know it!)
Photos of knitted polymer clay