Some time ago I presented the Tartan Generator, now comes ‘his brother’, the stripe generator.
There you can let easily and fast let make striped backgrounds.
I will surely need it, i.e. when creating a birthday card.
Links:
Stripe Generator
…compilation of tutorials
Some time ago I presented the Tartan Generator, now comes ‘his brother’, the stripe generator.
There you can let easily and fast let make striped backgrounds.
I will surely need it, i.e. when creating a birthday card.
Links:
Stripe Generator
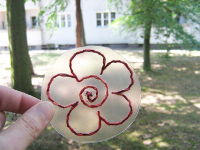
Actually I don’t want to talk only about Sashiko embroidery but about Sashiko embroidery on paper – I just prefer to embroider on paper ;-))
I discovered Sashiko embroidery one day when surfing the internet and found the results just beautiful!
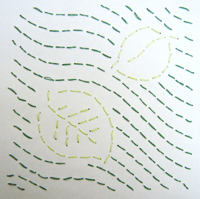
The basic principle (as far as I understood) is that Sashiko embroidery is mostly a shape filling embroidery and the lines are worked as ‘dashed lines’ where the spaces between the dashes are about half as long as the dashes themselves (simply check the tutorials (for ‘real’ Sashiko embroidery) in the links, they explained it better).
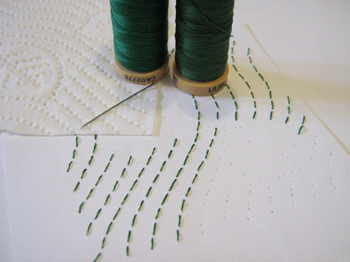
Then I saw one day that our toilet paper (top left on the picture) doesn’t only have a nice pattern but that I can use the pressure points for a Sashiko embroidery by using alternately the left and the right side of the points as needle entry points.
Therefore I trace-pricked the pattern on paper (bottom right on the picture) and embroidered it in two colours.
I find that you can’t see any more on the result that it is made by ‘cheating’ from toilet paper ;-))
 Here a look at the backside.
I will glue it on a card and send as a greeting card.
To people who use different toilet paper ;-))

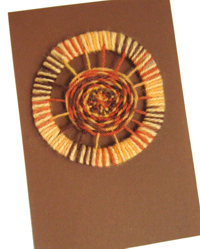
Recently I needed a card for a man which had to show the colours wine red and gold.
What is more I wanted it simple yet elegant and I think that it worked out ;-))
(Click the picture to get an enlarged view.)
 The pattern shows inside, too.
Because I didn’t like the writing to be directly on the wine red I put a crème coloured paper in.
 You can click the thumbnail of the template to download the enlarged template. The template is about 10 cm (appr. 4 inches), if you like to have a different size you will have to adapt the print size.
Simply lay the template on your card and prick all holes where you want to thread the yarn through (there are several possibilities, just try it).
Then weave in the thread.
Note: If you use an overlong thread you only get a thread tangle.
That’s why I worked in rings that I finished one by one.
You can find the technique that I used to thread the yarn through the hole in the entry Starburst Card.
I finished the ends of the threads on the backside as invisible as possible by laying them side by side and glueing them on.
In case that the backside of your card doesn’t look nice you can glue on a different coloured paper on both sides, that looks very good and conceals all imperfections.
Links:
Here at unikatissima:
Starburst Card: I show there how I weave the thread through the holes, here I did it the same way
Entries with the tags ‘paper’ and ’embroidery’
After I presented Jewelry for the Garden some time ago and yesterday the Tomato Tube Leaves I want to present today three more garden decorations from joghurt cup lids and acrylic yarn.
Instruction for the 1. decoration, the 2. decoration, the 3. decoration
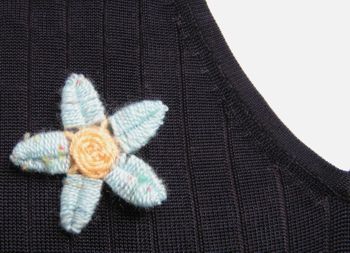
 As you can see the ornament can be used for a greeting card as well ;-)
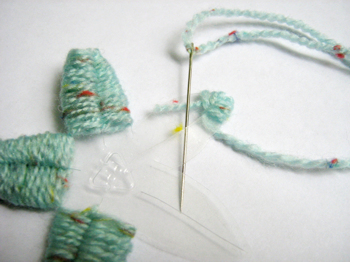
I used a transparent joghurt cup lid (from a 500g joghurt cup) and variegated acrylic yarn.
Additionally you will need a darning needle.
 Cut a broad rim from the lid and prick 16 holes.
Then weave a spiderweb through the pre-pricked holes.
You can click the thumbnail of the template to download the enlarged template. The template is about 10 cm (appr. 4 inches), if your lid size is different you will possibly have to adapt the print size.

Weave the spiderweb: always over and under the threads, as long as you like.

Subsequently I complemented the yarn with another with a matching colour and wrapped both around the broad plastic rim.
The crochet hook made the work sometimes easier but isn’t necessary.
I glued the ornament onto a card but you can attach it to a wooden stick, e.g. a kebab skewer, too, and put into a flower box or a flower bed.
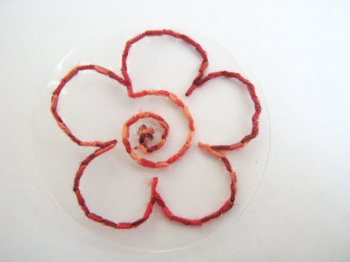
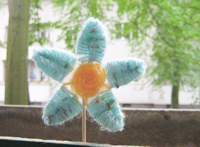 I made this ornament with a lid from the same joghurt and with acrylic yarn, also.
 Cut your joghurt cup lid following this template (click the thumbnail of the template to download the enlarged template. The template is about 10 cm (appr. 4 inches), if your lid size is different you will possibly have to adapt the print size.)
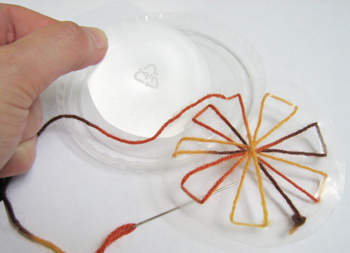
You must also cut the black lines in the petals, but they must not reach the edge.
Begin ‘in’ a petal and weave both wings of the petal in eights until they are completely covered in yarn (from the center to the left and back to the center, from the center to the right and back to the center, repeat).

Then prick a hole in the center of the flower and weave a net (in a contrasting colour) (see photo).
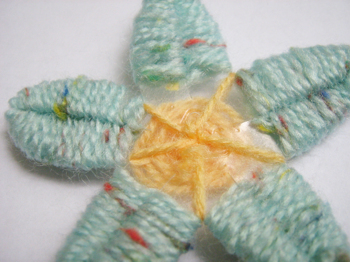
Weave the yarn around the threads, always over and under the thread.
If you use the ornament as a pin or for a greeting card it is enough to weave only one side of the flower, otherwise you must work on both sides.
 Of course this ornament has been made with a lid from the same joghurt and with acrylic yarn ;-)
This time a darning needle is absolutely necessary.
 Cut and prick your joghurt cup lid following this template (click the thumbnail of the template to download the enlarged template. The template is about 10 cm (appr. 4 inches), if your lid size is different you will possibly have to adapt the print size.)
Simply embroider the pattern: always in and out and if you like, back again.
Links:
Here at unikatissima:
Jewelry for the Garden
Tomato Tube Leaves
Here on this page:
Instruction for the 1. decoration
Instruction for the 2. decoration
Instruction for the 3. decoration
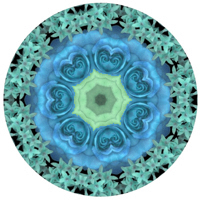
I found another wonderful toy: the kaleidoscope for photos.
I made the picture with the given flower photo (I used the pink ‘umbrella’ at the left top) and post-worked it a little.
I like it!
You can make beautiful greeting cards or the like with this.
Links:
Make Your Own Kaleidoscope!

I just wanted to show once more how beautiful embroidery on paper and cardboard can be ;-)
Here I cut a beautiful blue patterned square from a magazine and glued on white cardboard.
Then I drew very faint curved lines with a pencil, pricked holes along the lines and stitched them with a chain stitch.
Looks fine, doesn’t it?
I find though that the chain stitch looks much better on straight lines or wide curves than on sharp turns (it ‘inclines’ somewhat), that’s something one could pay attention to when drawing the lines.
Links:
Instruction for chain stitch
Here at unikatissima: Embroidered Matisse Cushion
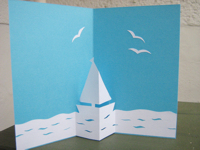
Recently I re-discoverd the website of Lisa Vollrath whose tutorials I always found really great.
When I saw her ‘A Simple Tabbed Pop-Up’ I wanted to try it immediately.
But then it started: No, I don’t want to make an Eiffelturm, but something else. But what? Somebody wrote something about sail boats in the comments.
Ok, good idea.
Ehm, the toner of my printer won’t suffice to print something.
Hmm, Lisa said that actually it doesn’t matter how large the tabs are…

Thus I took an A4 paper horizontally and my Xacto knife and startet to cut a sail boat and the sea.
I find my card for a try on the spur of the moment quite nice, but I haven’t decided yet what to put on the front side ;-)
Links:
At Go Make Something: A Simple Tabbed Pop-Up

I found a fantastic tutorial on how to colour (more or less) haphazardly stripes of cardboard!
I put it at the top of my try-it-list (and it pushes other things down the list ;-)).
Links:
Psychedelic Batik Cardstock

I found the umpteenth instruction on how to cut a snowflake from paper, but this time the snowflake looked so much more beautiful than usually.
I made immediately a card with non winterly coloured advertising junk mail paper :)
Links:
Fidgety Fingers: Magazine Manifesto – Paper Snow
Here at unikatissima: Kirigami Flower

I found an instruction on how to make shaped cards.
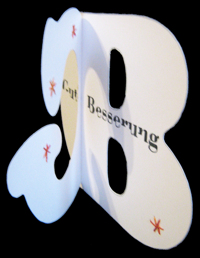
I really liked the flower cards e.g., but I’m more one for thinking in words than in pictures. All I could think about when needing a ‘Get well soon card’ was therefore making a card from the letters G and B (in German, ‘Get well soon’ is ‘Gute Besserung’) ;-)
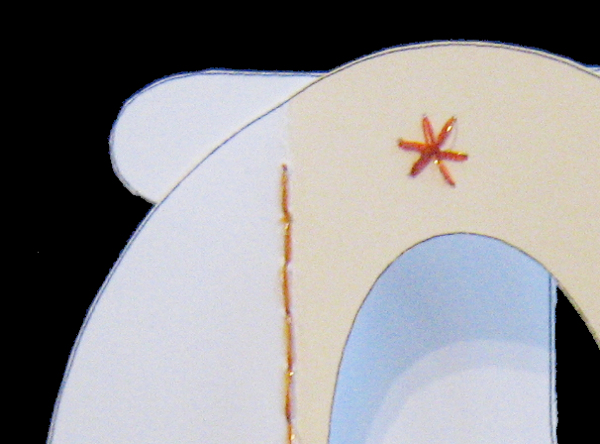 (Click picture to enlarge)
I joined them with an embroidery stitch (running stitch back and forth) and embroidered some little ‘flowers’ ( I looove embroidery on paper ;-)).
I like it and I hope that it ‘helps’ ;-)

Links:
Creating Shaped Cards
via Nuttnhoney Great Tutorials
Instruction on how to make the Running Stitch
Instruction on how to make the Running Stitch (Vorstich) (German)
Here at unikatissima: Paper Crazy Quilt