Necklace out of Laddered Stockings and Tights

Smaggle Stockings Necklace

If it’s cold outside I confess that I often wear tights and when they become eventually laddered I always find it a pity to throw them away.
And I won’t in the future because I found an instruction on how to make a necklace out of laddered stockings and tights ;-))
At the moment I’m still wearing them at my legs, but soon…
;-)


Links:
How to Make a Necklace out of Laddered Stockings and Tights.
(found via art for housewives)

Gift Bagalopes

unikatissima Gift Bagalopes

I found an instruction on how to make easy gift bags from envelopes. The result looks really nice and I already arranged my envelopes and stamps


Links:
Very Easy Gift Bagalopes

Here at unikatissima:
Eraser Stamps
More entries with the tag ‘stamping’

Mini Recycle Bin Books

erinzam Mini Recycle Bin Books

People who craft a lot with paper often have many interesting papers laying around, but mostly scrap you can only make cards from.
But now I found a tutorial on how to make mini recycle bin books, which I find great!

Soon I will have to comb through my piles ;-))


Links:
Mini Recycle Bin Books

Easily Remove Pages From Books

unikatissima Easily Remove Pages From Books.jpg

If you want to make Altered Books or Artist Books, or maybe book purses, or you want possibly remove individual book pages to make a beautiful card, then the tutorial on how to easily remove pages from books may be helpful: you moist a thread, lay it into the book at the place where you want to remove a page, close the book firmly, so that the moisture can enter the paper and then you can tear the paper cleanly.
It’s the same principle as for tearing paper, but here the moist line is certainly straight and much thinner.
Ingenious!


Links:
At instructables: How to easily and cleanly remove pages from books

Here at unikatissima:
Artist Book
Notebook Purse
Tearing Paper

Shoulder Pad Purse

dianefitzgerald Shoulder Pad Purse

I find bags, purses and totes somehow interesting, especially when made from unusual materials (although I think that I will always stick to my knapsack ;-)).
That is the reason why I like the shoulder pad purse (scroll down to “Shoulder Pad Mini-Purses,”) so much!
Unfortunately I have only found boring white shoulder pads.
Well, they’d never make a knapsack ;-))


Links:
Shoulder Pad Purse (scroll down to “Shoulder Pad Mini-Purses,”)
Note: When I downloaded the PDF file, it had about 2.5 MB.

Shibori Felt Scarf

bishugelabs flickr Shibori Felt

I found an interesting technique: tying scarves in Shibori technique and then felting them.
On the picture you see some photos you can get when searching flickr for the tags ‘shibori felt’.
Really great, aren’t they?


Links:
I found several instructions:
Shibori felt scarf

via the craftzine ‘shibori felting’ entry:
Entries with the tag ‘Shibori’ at blog.betzwhite.com
Shibori felting tutorial at whipup
More about Shibori felting at CraftyPeople

Furthermore:
Google search result for ‘shibori felting’
Google image search result for ‘shibori felting’

Flickr search result for ‘shibori felt’

Wikipedia entry for ‘Shibori’

I made the mosaic with the Mosaic Maker of Big Huge Labs.
The images are:
First row:
shibori, dry and untied by monattka
Shibori Scarf by elanknits
Shibori – first attempt :) by raspberryfairy

Second row:
Shibori felt (stage 1) by Feltbug
shibori felt detail by Carole K
Felt Shibori by woolly fabulous

Paperless Origami

unikatissima Paperless Origami

If you’re folding origami figures they often come undone, are collapsing or sagging.
That’s especially vexing if they were meant to be a holiday decoration.
But now I found a very good solution to avoid sagging origami figures: fold the origami figures from fusible interfacing.
I must say that I find the photos of the tutorial persuasive.
Something more to try one day ;-))
(P.S.: On the photo you can see my iron for a start, I still have to purchase fusible interfacing ;-))


Links:
Paperless Origami

String Decorated Ornaments

crealic String Decorated Ornament

A nice method to create beautiful Christmas tree ornaments (and much more) shows this tutorial on how to make string decorated ornaments (French).

It’s very easy:

  1. You choose the element to be decorated ((foam) sphere, box, paper bag etc.).
  2. Paint the pattern on with PVA glue (if necessary after sketching them with a pen).
  3. Put the string on the glue and fix with pins. The glue dries transparently.
  4. After the glue has dried, take away the pins and paint your ornament (or box or what ever you decorated). You can paint the string in another colour than the element. Additionally you can paint some little decorative patterns to lighten the background.

Best if you check the photos of the instruction, they explain every thing very well.


Links:
String Decorated Ornaments (Décors divers en ficelle) (French)

Recycle books

unikatissima Recycling Books

Soon it may be that you get lots of books. You want perhaps to get rid of some old books – or even some new ;-))
Via How to Make and Do-How to recycle Books I found a tutorial for a really great book lamp.
There you can find other good ideas, too.
Find more ideas at How can I Recycle This?, e.g. to make an Altered Book from.
Then I found a tutorial on how to make a book lampstand (which I don’t find as beautiful as the book lamp, but it ‘uses’ more books ;-)).
I also liked the Bookhooks and Romans a clef great as an inspiration for crafters ;-)
I guess that you can make jewelry stands in the same way?!
I also found the book book ends, the book safe and another book safe, the “Audiobook” (an iPod case), the book book shelf and and and … ;-)


Links:
Recycle books
… into a book lamp (at instructables.com)
    (via How to Make and Do-How to recycle Books and How can I Recycle This?)
… into a book lampstand
… into a coat hook
… into a key hanger (via Siebensachen)
… into an artist book (here at unikatissima)
… into book book ends (at instructables.com)
… into a safe (and another safe) (at instructables.com)
… into an iPod case (“Audiobook” ;-)) (at instructables.com)
… into a book book shelf (at instructables.com)
…and much more ;-)

Magazine Embroidery Hoop

unikatissima Magazine Embroidery Hoop

Once I’ve seen somewhere (but I don’t remember, where ;-() how somebody made an embroidery hoop from magazine paper.
On the photo you see how it looks. I used quite stiff advertising paper and the hoop became very robust.
This way I can make fast and cheap embroidery hoops in different sizes :)

Material:

  • Paper, e.g. advertising paper
    It should be strong and may not stain(!) the fabric.
  • Log or dowel
    I used a 8mm knitting needle
  • Tape
  • Drinking glass or the like with the required diameter

That’s what you do:
unikatissima Magazine Embroidery Hoop Select appropriate paper sheets.


unikatissima Magazine Embroidery Hoop Roll and fold the paper sheets to paper strips of equal width (see tutorial here).


unikatissima Magazine Embroidery Hoop Coil one paper strip firm around the glass and fix with tape.


unikatissima Magazine Embroidery Hoop Tape the hoop very well.


unikatissima Magazine Embroidery Hoop Slip the hoop over the glass again and coil the second strip of paper very firmly around the first hoop, tape very well, too.


unikatissima Magazine Embroidery Hoop These are both hoops, one can be slipped exactly over the other.


unikatissima Magazine Embroidery Hoop 
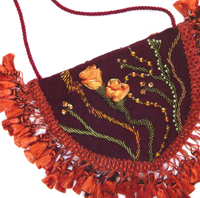
Put the fabric into the embroidery hoop and embroider.
I didn’t iron the fabric, but it’s firmly tightened into the hoop.


unikatissima Magazine Embroidery Hoop That’s the way everything looks from the backside.


Have fun with your embroidery :)


Links:
Here at unikatissima: Folded Paper Strips of Equal Width