Some people are fantastic!
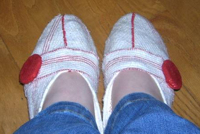
At craftster somebody published a tutorial on how to make yourself cheap shoes.
I don’t know whether I will make some, but I wanted to present it anyhow!
Links:
At craftster: Self-made Shoes (Shoes!)
…compilation of tutorials
Some people are fantastic!
At craftster somebody published a tutorial on how to make yourself cheap shoes.
I don’t know whether I will make some, but I wanted to present it anyhow!
Links:
At craftster: Self-made Shoes (Shoes!)
There remained some leftovers from our cut plastic bottle, from which we already made a knitting loom and a plastic box and we can use them to make some beads.
In the instruction on how to make plastic bottle beads they roll up the plastic strip and melt it together with a heat gun.
I don’t have no heat gun and I’m a little afraid of possibly developing fumes, therefore I did it in a different way:
 I brought water to the boil in my craft pan (which I don’t use for food preparation anymore!).
Then I cut a stripe from the plastic bottle and rolled tightly using some tweezers.
Look out, it always try to uncoil!
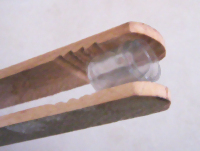 I hold the rolled ‘bead’ with my craft wooden pliers (also not used for food preparation anymore) into the simmering water and in seconds the bead was finished.
I don’t know if I could have coloured the bead with permanent markers, I’ve forgotten to test this.
Besides the end doesn’t fuse with the bead, but it doesn’t open neither.
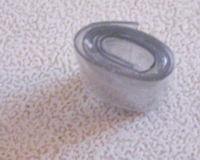 Because it always wanted to uncoil I hold it quite firm with my wooden pliers and the bead became a little flat.
Pressing it in the other direction and dipping into the simmering water again didn’t make the bead round.
But 1. I like the shape and 2. I think it’s only a matter of practice.
Links:
Plastic Bottle Beads
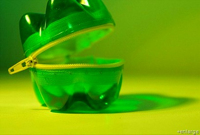
Yesterday we cut a plastic bottle to make a knitting loom, today we can make a box from the cut off bottom of the bottle.
It’s not a real instruction, but when you look closely at the photos you can see that the plastic bottoms are perforated at the edge and that a zipper is sewn into the holes.
Fantastic!
Addendum: There are instructions now, you can find the English ones here (thanks, Nina).
Links:
Plastic Bottle Box (recycled box/Recycling Box)
English instructions
German instructions
I’ve seen the photo and found it time-consuming to find the source:
I found the link to the plastic bottle box:
via Need More Fiber,
via Dollar Store Crafts (they have more great ideas!),
via greenUPGRADER,
via Superuse.org
I thought that I’d never reach an end ;-))
By the way I suggest to take a look a the flickr group TRASHION NATION, they also have great ideas!

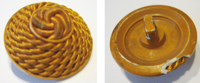
I always wanted to play around with a knitting loom, but I won’t buy such an item!
Therefore I was delighted when finding the instruction on how to make a knitting loom from a plastic bottle.
For a begin she even added a tutorial for a much easier knitting loom from a toilet paper roll and some popsicle sticks (that’s no April Fool’s joke ;-))!
I will try the loom from the bottle in any case :)
Links:
Knitting Loom from Plastic Bottle (How To’s Day: Bored? Nothing to do, Make a knitting loom with stuff in your house!)
Basic Loom and Board Instructions
There are two PDF files: Knitting Board Basics (ca 790 KB) and Loom Knitting Basics (ca 3300 KB)
She even added a tutorial on how to make mitered squares with a knitting loom (see also here at unikatissima the Patchwork knitting and the Module Sock)
Here at unikatissima:
Patchwork knitting
Module Sock

I’ve often seen bowls made from old vinyl records, but I find the bracelets from vinyl records nevertheless special.
Even so I won’t make none because I won’t be able to ‘batter’ the vinyl records like that ;-)
Links:
At craftster: Vinyl Record Bracelets
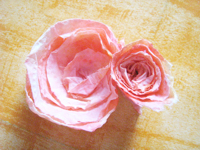
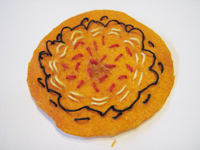
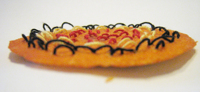
I found an instruction for a nice paper flower and thought that this should work with self-coloured paper, too.
It did ;-)
 First I painted on a sheet of toilet paper with some markers.
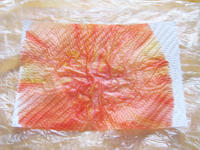 I dropped water on my ‘painting’, but it was a little too much water and everything swam.
In order not to get everything dirty I have put it luckily on an old little plastic bag.
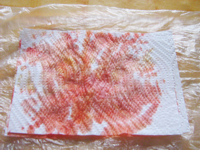 Therefore I put another sheet of toilet paper onto the first, the water and the dye dispersed on both.
I blow-dried everything to dry it faster ;-)
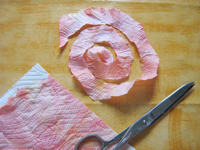 I cut my papers by guess and by gosh, that is to say without a pre-sketched spiral and my scissors were quite blunt.
That may be the reason why my little ‘roses’ look so beautiful ;-)
Links:
Paper Flower – the tutorial works backwards, you must always click the previous picture to get the next step
I found something new to collect: carpet samples!
What for? For instance for a rocking chair, a pet house or a fancy vase.
Simply take a look at Ample Sample Ample Sample (scroll down to 2008 winners).
And the best of all: For all those things they offer instructions.
Crazy! ;-))
Links:
Ample Sample Winners
Tutorial moved to: Ample Sample Winners => scroll down to 2008 winners

This time it’s no ‘real’ instruction but an inspiration: Embellished Grapefruits Embellished Grapefruits. (Click there for the actual pieces on the thumbnails and see e.g. Two Pods Two Pods.)
Because I’m always impatient I preferred to use a piece from an orange – grapefruits are so big ;-)
While working I had a lot of fun.
I like the embroidery of orange peels nearly as much as embroidery on paper. The most uncommon thing I had to do was to give my needle a wash ;-))
 After the embroidery I put the orange peel between several layers of tissue paper in an old telephon book and let it dry ‘flat’.
Actually I had hoped that I can coat it with medium gel afterwards and wear as a pendant, but I don’t really like the ‘flat version’ of my orange peel.
 I find worst that the threads now stand up now like croquet wickets, I really don’t like this.
At the next opportunity I will see if I can make it better.
If it works I will perhaps embroider beads on, that should be interesting, perhaps Paisleys or simply Freeform.
Links:
Grapefruit – click there for the actual pieces on the thumbnails and see e.g. Two Pods
The original site doesn’t exist any more and is now available through webarchive:
Grapefruit – click there for the actual pieces on the thumbnails and see e.g. Two Pods
Embroidery stitch descriptions (English)
Embroidery stitch descriptions (German)
Here at unikatissima:
Paper Crazy Quilt
Freeform Bead Embroidery
Bead embroidered Paisleys
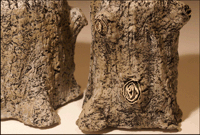
I’ve seen several paper maché objects, but jars looking like stumps are still something special to me.
Something especially cute ;-))
I’m not totally sure that I should make them myself ;-), but I liked them so much that I wanted to present them here.
Furthermore I didn’t know this paper maché preparation, I really like to give a try some day.
Links:
Papier-mâché Faux Bois
via One Pretty Thing
I presented already several tutorials with the subject ‘felting’ but I always discover more that I find brilliant and where I would never have had the idea myself.
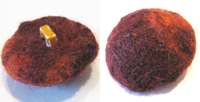
One of them is the idea to felt buttons (German with good explaining photos).
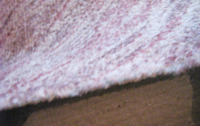
 I have lots of old buttons and as you can see on the photo not all look very nice.
I like the felted button much better, even though it was nothing but a first test.
I think that I could even embroider it, just like the needle felted bead cabochons and the bottlecap pincushions.
Links:
Felting Buttons (Knöpfe umfilzen) (German with good explaining photos)
via faserfimmel
Descriptions of embroidery stitches (English)
Descriptions of embroidery stitches (German)
Here at unikatissima:
Entries with the subject ‘felting’
Needle Felted Bead Cabochons
Bottlecap Pincushions