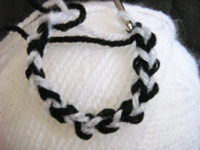
Recently I found an instruction on how to make a two-coloured crocheted cord – so easy, but I’d never have thought of it!
Sure, the simplest ideas are the best ;-)
…compilation of tutorials
Recently I found an instruction on how to make a two-coloured crocheted cord – so easy, but I’d never have thought of it!
Sure, the simplest ideas are the best ;-)

Valentine’s Day makes everything more heart-ily somehow ;-))
Besides I wanted to show what you can do else with the heart template of the day before yesterday (Beaded Square Stitch Heart), viz. a really nice cross stitch heart.
I didn’t have any Aida fabric or similar, besides I always prefer to embroider on paper or fine cardboard ;-)
I therefore glued some plain gift wrap paper on fine cardboard, pre-pricked the holes (which you should always do when embroidering on paper) and embroidered my heart with metallic sewing threads (instructions on how to embroider the cross stitch see links below).
Subsequently I connected the border holes, cut the cardboard into a nicer shape and glued it on a greeting card.
I really like it ;-)
 Click picture to enlarge and then simply print.
Links:
Kids Stitch Diagrams and Instructions Part I
Tutorial moved to: Kids Stitch Diagrams and Instructions Part I => scroll down
At Embroiderers’ Guild: Cross Stitch
What else you can do with cross stitches (at Embroiderers’ Guild also):
Pattern Making with Cross Stitch
Flinkhands Kreuzstichanleitung (German)
At crossstitch.about.com: About Aida fabric
At Wikipedia: Stramin (German)
Here at unikatissima: entries with the words ’embroidery on paper’,
especially the Paper Crazy Quilt and the Crazy Quilt Photo Frame

There’s a technique I haven’t tried yet although I have on my list for a very long time, and that’s tablet or card weaving.
It’s a very old technique I learned to know first in Museumsdorf Düppel, the reconstruction of an 800 year old village.
With card weaving you can make soo wonderful straps, similar to Kumihimo (but only similar! ;-)).
I’m at the point ‘already’ where I looked for some instructions (see links below) ;-)
Links:
Basic Tablet Weaving
Cardweaving Made Easy
The original site doesn’t exist any more and is now only available through: Cardweaving Made Easy
Linklist for ‘Tablet weaving’ incl a list of instructions
Google search result for ‘card weaving’
Google image search result for ‘card weaving’
Flinkhands Brettchenweben (German): click through to what you are interested in
Flinkhand’s card weaving beginners tutorial at creadoo (German)
The original site doesn’t exist any more and is now only available through webarchive: Flinkhand’s card weaving beginners tutorial at creadoo (German)
Card weaving tutorial (German)
Card weaving tutorial (German)
Wikipedia article: Museumsdorf Düppel (German)
Here at unikatissima: Entries with the tag ‘Kumihimo’
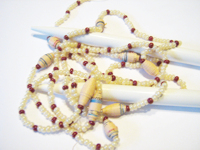
I found at knitty the instruction for the knitted bead cuff ‘Bauble’ and really liked it.
Therefore I wanted to knit at least a bit to see how it looks.
Because I don’t have any bigger beads at the moment I used some left over paper beads.
But I didn’t manage to knit the bead string at all.
I really must try it again when I’m a little more untroubled because I really find Bauble beautiful!
Here at unikatissima: Paper Beads
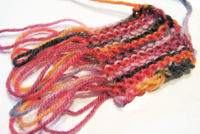
The other day I found an instruction on how to easily make fringes on a knitted item: Knit the whole item wider than later desired, bind off only a part of it and unravel the rest.
You get ‘real’ fringes when cutting the loops, but because the item on the photo was only a test piece I didn’t want to cut the yarn.
Links:
Knitted Fringe (scroll down a little)

I found an interesting technique: tying scarves in Shibori technique and then felting them.
On the picture you see some photos you can get when searching flickr for the tags ‘shibori felt’.
Really great, aren’t they?
Links:
I found several instructions:
Shibori felt scarf
via the craftzine ‘shibori felting’ entry:
Entries with the tag ‘Shibori’ at blog.betzwhite.com
Shibori felting tutorial at whipup
More about Shibori felting at CraftyPeople
Furthermore:
Google search result for ‘shibori felting’
Google image search result for ‘shibori felting’
Flickr search result for ‘shibori felt’
I made the mosaic with the Mosaic Maker of Big Huge Labs.
The images are:
First row:
 shibori, dry and untied by monattka
Shibori Scarf by elanknits
Shibori – first attempt :) by raspberryfairy
Second row:
Shibori felt (stage 1) by Feltbug
shibori felt detail by Carole K
Felt Shibori by woolly fabulous

After having played around with Crazy Daisies (see links below) I found out that you can make a ring from them very easily.
 You take a Crazy Daisy (instructions see links below) and attach a ring ;-)
 In this case I made and attached a simple, single-coloured Kumihimo strap from the same yarn I used for the Crazy Daisy.
I could have used a simple wire ring, similar to the River Troll Ring, a woven ring, a macramé ring similar to the Beaded Macramé Bracelet, a fingerlooped ring, a crocheted or knitted ring, a simple beaded ring, a Peyote Ring, etc etc etc ;-))
Links:
Here at unikatissima:
Crazy Daisies
Crazy Daisies II
Kumihimo
Fingerloop Braiding
Rings and similar items here at unikatissima:
River Troll Ring
Woven Ring
Beaded Ring
Peyote Ring
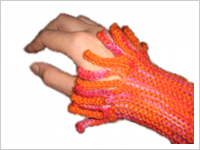
Once I saw the Worm Scarf and having read the instruction for the ‘worms’ I thought that you can knit great fringes this way.
I begun with wristwarmers and after having finished them they looked like the sea anemones called Actinia.
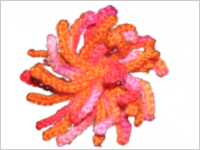
Then I was hooked and knitted an Actinia headband, an Actinia ring and an Actinia brooch (see pictures below).
It is soooo much fun ;-)
And for all this items I wrote a tutorial. You can find the link below at the links.
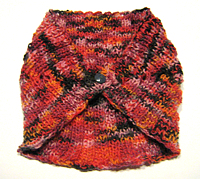
 This is the headband.
It is just possible that there are slightly too much fringes!?
;-)
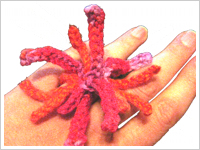 My Actinia ring – cute, isn’t it?
 That is the brooch. It looks great on my black overcoat.
 The Actinia wristwarmers and ring can easily be worn over woollen gloves if it’s really cold.
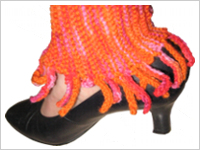 I haven’t done the Actinia anklewarmer yet, I made the picture with my not yet sewn wristwarmer.
Looks great, doesn’t it?
Links:
unikatissima’s Englisch tutorial for Actinia (PDF – ca. 400 KB)
(with explaining photos)
unikatissima’s German tutorial for Actinia (PDF – ca. 400 KB)
(with explaining photos)
There you find instructions on how to
knit items with fringes,
add knitted fringes to finished items,
knit the wristwarmers,
knit the headband,
knit the ring,
knit the brooch and
knit an I-cord.
I also added ideas for more ways to befringe items.

I really wanted to have a hat, but with my ponytail I don’t like them.
The Calorimetry Headband was the solution and I knitted it in a very short time.
You can see it on the photo ‘in action’.
(To take a photo of myself is not as simple as I thought ;-)))
I find the Calorimetry Headband brilliant.
First: a hat is for people with long hair often difficult to wear and the headband put all those problems away.
Second: I like the short rows pattern.
And third: because it can be done in a really short time it is a very good gift for the (ok, last but one) minute.
And it can even be knitted by impatient people ;-))
I had to adapt the size and the number of stitches, because I used totally different yarn, but I’m really pleased with it ;-)
Links:
At knitty: Calorimetry
Wikipedia entry: Calorimetry
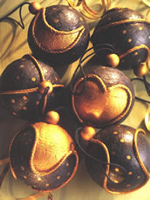
A nice method to create beautiful Christmas tree ornaments (and much more) shows this tutorial on how to make string decorated ornaments (French).
It’s very easy:
Best if you check the photos of the instruction, they explain every thing very well.
Links:
String Decorated Ornaments (Décors divers en ficelle) (French)