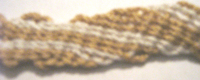
When knitting or crocheting you have sometimes the problem that you have to attach some new yarn.
I found a great instruction on how to join (nature!) yarns.
Cold felting with spit ;-))
Links:
Joining Yarns (Spit Splice)
…compilation of tutorials
When knitting or crocheting you have sometimes the problem that you have to attach some new yarn.
I found a great instruction on how to join (nature!) yarns.
Cold felting with spit ;-))
Links:
Joining Yarns (Spit Splice)
(Click on picture to enlarge)
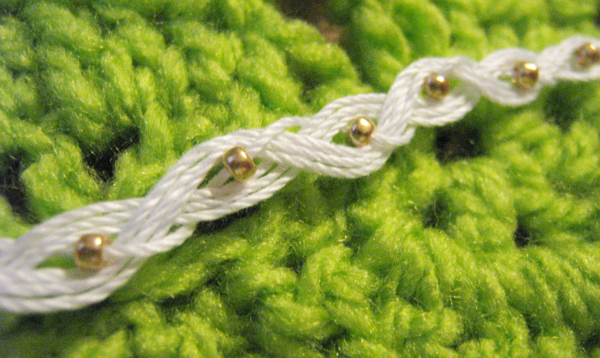
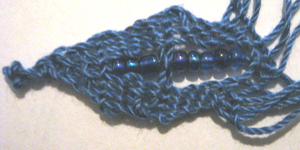
Recently I saw a woman in the underground wearing a bracelet that I liked.
It looked quite easy and after trying it I noticed that it is ;-)
That’s what you do:
 Knot seven threads together and fix somewhere.
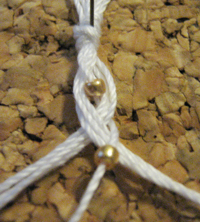
String beads on the middle thread and part the other six threads in two strands.
Note: I used some cotton crochet thread for the test because I didn’t have no beads to be strung on heavier yarn.
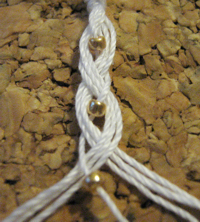 Braid the three strands just like you’d do with your hair.
Make sure that the threads of the strands made of several threads lay neatly side by side.
As for the middle thread let lay a bead between the other strands at every braid.
Braid until you reached the desired length for a bracelet or a necklace and add a matching closure at both ends (links to closures see below).
The bracelet I’ve seen was made of hemp or the like, but I think that it would look great with fine leather strings, too.
As well I guess that one could use different sized beads and of course you can omit the beads.
Google search results for the making of closures:
Google search result for ‘bracelet closure’
Google image search result for ‘bracelet closure’
Google search result for ‘armband verschluss anleitung’
Google image search result for ‘armband verschluss anleitung’
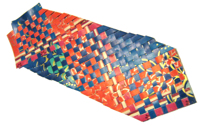
A long time ago I found a tutorial on how to make bookmarks with Ugandan Weaving, but the site doesn’t exist any more and I couldn’t find it in internet.
Therefore I wrote something myself.
That’s what you do:
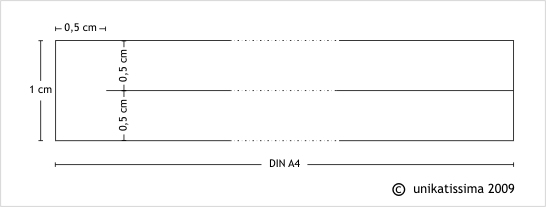 First of all you must cut the paper stripes.
Take two coloured DIN A4 sheets and cut them in stripes of 1 cm.
Slit them in the middle, but let at one side a little piece (0,5 cm) unslit so that the stripes don’t fall apart.
You can see this best on diagram 1 (click to enlarge).
 Then lay the stripes side by side and weave them as seen in diagram 2 (click to enlarge).
I sketched it as if there were 4 colours, that looks also nice.
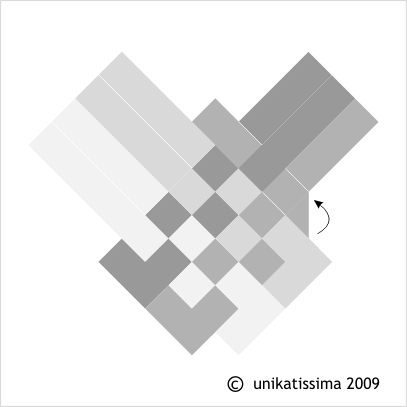 When all stripes are woven fold the outer stripes back and weave on (see diagram 3, click to enlarge).
Continue until you’re satisfied.
You can see on the photo on top that I haven’t read the instruction thoroughly: I didn’t take stripes of 1 cm but much broader ones, although I slit them every 0,5 cm, too.
The disadvantage is, that the stripes are pushed apart and therefore the beginning (left of picture) doesn’t look very nice (although I took the photo so that it’s not to be seen ;-)).
When you take the 1 cm stripes which are slit once this effect doesn’t occur.
I taped the ends together with clear tape.
And I made the coloured papers by glueing two Christmas gift wrap papers together :)

Links:
Original site where I found the tutorial for Ugandan Weaving. When I tried it, it didn’t exist any more.
The site has been saved by webarchive.org, but without the (important!) diagrams: site without diagrams (note: very long loading time).
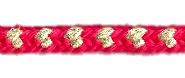
No, today we won’t use the heart template from the last days ;-))
But we’re talking again about hearts for Valentine’s Day ;-)
This time in combination with Kumihimo: Check out the Kumihimo cord with a heart pattern. Cute, isn’t it?
I didn’t start yet to make this cord, it’s still time until Valentine’s Day ;-)))
Links:
Kumihimo Cord with Heart Pattern
Here at unikatissima:
Entries with the tag ‘Kumihimo’, especially the entry Kumihimo where you can find a template for a cardboard Kumihimo disk

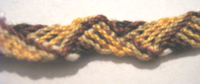
There’s a technique I haven’t tried yet although I have on my list for a very long time, and that’s tablet or card weaving.
It’s a very old technique I learned to know first in Museumsdorf Düppel, the reconstruction of an 800 year old village.
With card weaving you can make soo wonderful straps, similar to Kumihimo (but only similar! ;-)).
I’m at the point ‘already’ where I looked for some instructions (see links below) ;-)
Links:
Basic Tablet Weaving
Cardweaving Made Easy
The original site doesn’t exist any more and is now only available through: Cardweaving Made Easy
Linklist for ‘Tablet weaving’ incl a list of instructions
Google search result for ‘card weaving’
Google image search result for ‘card weaving’
Flinkhands Brettchenweben (German): click through to what you are interested in
Flinkhand’s card weaving beginners tutorial at creadoo (German)
The original site doesn’t exist any more and is now only available through webarchive: Flinkhand’s card weaving beginners tutorial at creadoo (German)
Card weaving tutorial (German)
Card weaving tutorial (German)
Wikipedia article: Museumsdorf Düppel (German)
Here at unikatissima: Entries with the tag ‘Kumihimo’
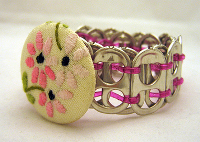
I find this bracelet beautiful. Unfortunately we never drink from aluminium cans, so no poptabs pile up. Therefore I will have to do without my own poptab bracelet.
Links:
At flickr: Poptab Bracelet
There are solely very good explaining photos, no text, simply view always the next photo.

After having played around with Crazy Daisies (see links below) I found out that you can make a ring from them very easily.
 You take a Crazy Daisy (instructions see links below) and attach a ring ;-)
 In this case I made and attached a simple, single-coloured Kumihimo strap from the same yarn I used for the Crazy Daisy.
I could have used a simple wire ring, similar to the River Troll Ring, a woven ring, a macramé ring similar to the Beaded Macramé Bracelet, a fingerlooped ring, a crocheted or knitted ring, a simple beaded ring, a Peyote Ring, etc etc etc ;-))
Links:
Here at unikatissima:
 Crazy Daisies
Crazy Daisies II
Kumihimo
Fingerloop Braiding
Rings and similar items here at unikatissima:
River Troll Ring
Woven Ring
Beaded Ring
Peyote Ring
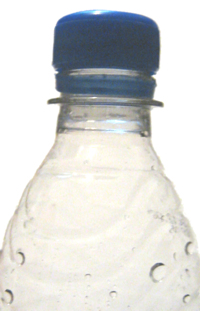
On a brasilian recycling website I found a good tutorial on how to make a box from PET bottles (click there on ‘Tutorial – How to make a square box’).
I won’t do this because we don’t buy so many PET bottles and if we do we can give them back.
But I think that the tutorial can be used with other materials, too, I will once take a look.
Links:
Utsumi – Crafts with PET plastic, click there on ‘Tutorial – How to make a square box’
Ply-split is a kind of weaving, but the multi-plied threads are woven through in place of over and under each other (ok, I understand, that this description isn’t very good, best take a look at the links below ;-))
In my entry Freeform Embroidery you can see at the bottom of the photo, too, how ply-split can look.
The photos show my attempts at ply-splitting, you can get a muuuch better idea by browsing the Google image search.
I once even tried to make a pendant with this technique, but it didn’t really work.
Anyhow I still like the combination of ply-split and beads.
Links:
Linda Hendrickson Tablet Weaving and Ply-Split Braiding: scroll down to ‘Ply-split braiding’
On the same site you can find articles about ply-splitting: click in the left navigational bar on ‘Links’, then click on ‘Ply-splitting’, then click on ‘Articles’, then you find 3 articles from Weaver’s
Ply-Splitting at weavershand: links to galleries, instructions and websites of ply-split artists
Instruction: Ply-split darning Bookmark: click in the left navigational bar on ‘Ply split braiding’, then click on ‘Begin Braiding 2d Ply Split’
Instruction for a ply-split scarf as PDF (ca. 156 KB) – it looks to me that one have to have some experience with ply-splitting
Instruction for a beautiful snake – it looks to me that one have to have some experience with ply-splitting
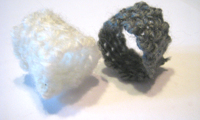
As said before, I like to play around with weaving.
The other day I thought: Why not weave a ring?
I think that it worked out amazingly good ;-))
Material:
What to do:

Wind the yarn around the finger replacement and knot.
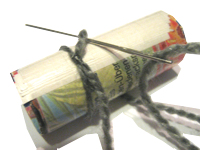
Then wind the next round, in doing so pass the yarn under itself.

Repeat the last step as long as you reach the ring’s width.
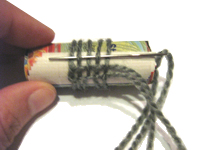
Now begin to weave: pass the yarn over and under the threads.
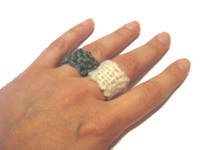
And that’s how the rings can look.
You have now a ring that you can embellish, e.g. with buttons or beads.
This technique surely can be enhanced, but it is fun already :)
Have fun!