Furoshiki

unikatissima Furoshiki

Once when I took a look at instructables I found the instruction Paper, Plastic, or Furoshiki? which fascinated me: Japanese use since a long time a cloth to wrap all sorts of things, as well to transport as to decorate them. And the Japanese Minister for Environment created an initiative to reduce waste to propagate Furoshiki as an ecological wrapping.
When making a little research I found even more Furoshiki folding instructions.


unikatissima Furoshiki
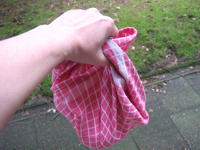
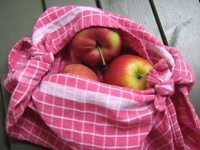
On the photos I wrapped four apples in a dishcloth – I just didn’t have a bandana or an old pillow case ;-) at hand.
In principle the dish cloth can be used but the knots get too big and it’s simply not the real McCoy.
Wikipedia says that the ‘real’ Furoshiki cloth are from cottom, rayon, nylon, a fabric called ‘chirimen’ or silk, in either case they are thinner and thus better to be knotted.
Also the sizes seem to be of a great variety, sure, you’ve always something different to wrap ;-)

Anyhow, I will try this more often :)

When researching I found also a nice idea: to wrap a gift for someone into an interesting cloth and include a printout of the diagram of the Japanese Ministry of the Environment.
I like this ;-)


Links:
At instructables: Paper, Plastic, or Furoshiki?

Furoshiki Techniques

Wikipedia entry for ‘Furoshiki’ (English) (I haven’t found a German entry)

Initiative for waste reduction (‘Mottainai Furoshiki’) of the Japanese Ministry of the Environment
Furoshiki folding diagram of the Japanese Ministry of the Environment

Blog entry with the nice idea about wrapping a gift

Google search result for ‘Furoshiki’
Google image search result for ‘Furoshiki’

Elastic Polymer Clay Bracelet

craftster Elastic Polymer Clay Bracelet

I found at craftster a fantastic instruction: how to make cute teapots from bulbs and polymer clay, how to make great candle holders from bulbs and polymer clay, how to make a genie lamp from bulbs and polymer clay (although she doesn’t say how to get a genie into the lamp ;-)) and how to make an elastic polymer clay bracelet from the left overs (ok, somewhen I had to come to the point ;-)).
Sheer lunacy! :)


Links:
Elastic Polymer Clay Bracelet (Trash to Treasure fun with lightbulbs!) – the instruction for the bracelet begins with the words ‘Ok, time for dessert.’

Spaghetti Scrap Scarf

Circe Spaghetti Scrap Scarf With I-cords

Again something to use up your stash: the Spaghetti scrap scarf.

In fact it is nothing else than a lot of I-cords that are connected in different ways.
And I find that it looks great! ;-)
There is another Spaghetti scrap scarf, but you can best see how different they can look when checking the ravelry pattern (unfortunately with registering only).

I have already begun to knit I-cords but unfortunately I find it nothing but boring, so I doubt that I will ever make such a Spaghetti scrap scarf.
But who knows? ;-)


Links:
Spaghetti scrap scarf ‘recipe’ (Qui aime la pasta?) (French)
Another Spaghetti scrap scarf (Encore une écharpe avec des i-cords) (French)

First found at ravelry:
Spaghetti scrap scarf (with i-cords)

Here at unikatissima:
Entries with the tag ‘stash’

Oil Lamp

unikatissima Oil Lamp

On the photo you see an oil lamp from an espresso cup, plain, cheap cooking oil and cotton. On the page with the instruction there are more but I always wanted to try this one.


And I learned a lot:

  • The tip of the cotton must peep out a good piece and be well twisted, otherwise the flame is too small (as you can see on the photo).
  • If the cotton is soaked it is quite difficult to bring it to burn (but be always careful anyhow!).
  • My ‘Espresso lamp’ burned about seven hours (!).
  • It hardly smelled.
 

unikatissima Oil Lamp
But: I always have to keep an eye on it: At the end when the oil was nearly burned the cotton began to burn and the cup was very, very hot and totally sooted.
Fortunately it didn’t break.

Part of the soot was ‘only smudgy’ and I could wipe it away, but part of it was kind of burned in and it took me the time of a whole motion picture (and lots of force!) to get the cup clean again.

Anyhow I will do this again because it is reasonably priced and beautiful.
Perhaps I will drip some drops of essential oil into, but first I must find out what puts off midges ;-)


Links:
Oil Lamp (Make Lamps–Not Vinaigrette)

Garden Decorations


After I presented Jewelry for the Garden some time ago and yesterday the Tomato Tube Leaves I want to present today three more garden decorations from joghurt cup lids and acrylic yarn.

 
Instruction for the 1. decoration, the 2. decoration, the 3. decoration


1. decoration

unikatissima Garden Decorations 
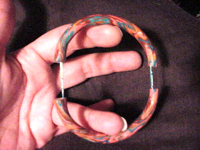
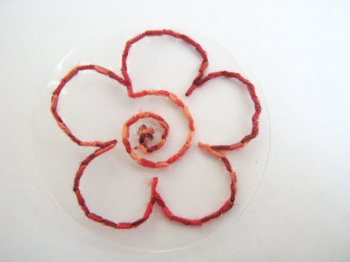
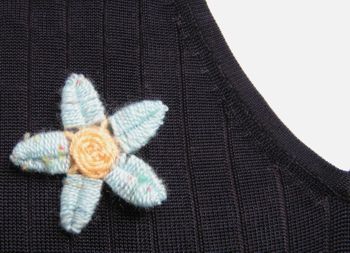
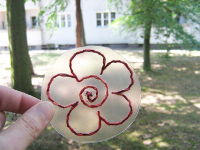
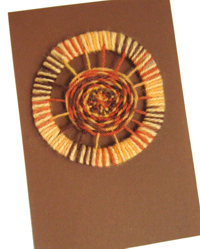
As you can see the ornament can be used for a greeting card as well ;-)


unikatissima Garden Decorations a
I used a transparent joghurt cup lid (from a 500g joghurt cup) and variegated acrylic yarn.
Additionally you will need a darning needle.


unikatissima Garden Decorations a Template Cut a broad rim from the lid and prick 16 holes.
Then weave a spiderweb through the pre-pricked holes.

You can click the thumbnail of the template to download the enlarged template. The template is about 10 cm (appr. 4 inches), if your lid size is different you will possibly have to adapt the print size.


unikatissima Garden Decorations a
Weave the spiderweb: always over and under the threads, as long as you like.


unikatissima Garden Decorations a
Subsequently I complemented the yarn with another with a matching colour and wrapped both around the broad plastic rim.
The crochet hook made the work sometimes easier but isn’t necessary.


I glued the ornament onto a card but you can attach it to a wooden stick, e.g. a kebab skewer, too, and put into a flower box or a flower bed.


2. decoration

unikatissima Garden Decorations b 
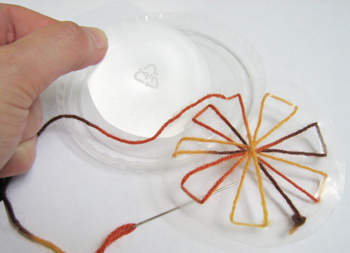
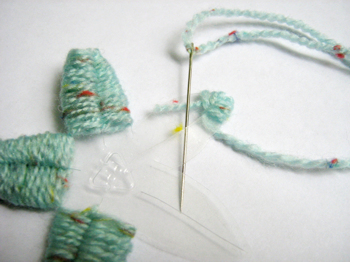
I made this ornament with a lid from the same joghurt and with acrylic yarn, also.


unikatissima Garden Decorations b Template Cut your joghurt cup lid following this template (click the thumbnail of the template to download the enlarged template. The template is about 10 cm (appr. 4 inches), if your lid size is different you will possibly have to adapt the print size.)

You must also cut the black lines in the petals, but they must not reach the edge.


unikatissima Garden Decorations a
Begin ‘in’ a petal and weave both wings of the petal in eights until they are completely covered in yarn (from the center to the left and back to the center, from the center to the right and back to the center, repeat).


unikatissima Garden Decorations a
Then prick a hole in the center of the flower and weave a net (in a contrasting colour) (see photo).


unikatissima Garden Decorations a
Weave the yarn around the threads, always over and under the thread.


unikatissima Garden Decorations a
If you use the ornament as a pin or for a greeting card it is enough to weave only one side of the flower, otherwise you must work on both sides.


3. decoration

unikatissima Garden Decorations c 
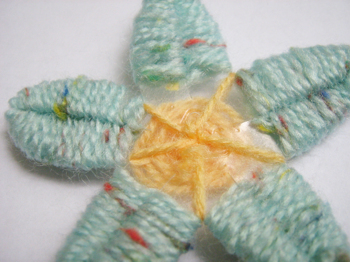
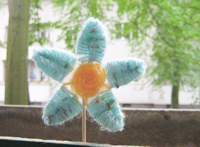
Of course this ornament has been made with a lid from the same joghurt and with acrylic yarn ;-)
This time a darning needle is absolutely necessary.


unikatissima Garden Decorations c Template Cut and prick your joghurt cup lid following this template (click the thumbnail of the template to download the enlarged template. The template is about 10 cm (appr. 4 inches), if your lid size is different you will possibly have to adapt the print size.)


unikatissima Garden Decorations c
Simply embroider the pattern: always in and out and if you like, back again.


Links:
Here at unikatissima:
Jewelry for the Garden
Tomato Tube Leaves

Here on this page:
Instruction for the 1. decoration
Instruction for the 2. decoration
Instruction for the 3. decoration

Tomato Tube Leaves

unikatissima Tomato Tube Leaves
Don’t those golden leaves look great?
A dear friend made them from (admittedly mustard ;-)) tubes and allowed me to show here how to make them.
Many thanks again!


That’s what you do:


unikatissima Tomato Tube Leaves
You need a (clean and empty! ;-)) tube with golden internal coating, scissors and a wooden stick, e.g. a kebab skewer.


unikatissima Tomato Tube Leaves
I folded up the tube which was cut open on three sides and cut out two equal leaves.


unikatissima Tomato Tube Leaves
First I flattened the leaves slightly and then I put the kebab skewer in and pressed them lightly until the midrib of the leaf begun to show.


unikatissima Tomato Tube Leaves
Then I scratched the leaf ribs with the back of my kebab skewer from the backside of every leaf.


unikatissima Tomato Tube Leaves
Afterwards I reduced one leaf by cutting away an edge of about 3 mm.


unikatissima Tomato Tube Leaves
I put both leaves on top of one another and scratched the outline of the smaller leaf slightly with the tip of my kebab skewer into the larger leaf.
Then I cut the edge of the larger leaf from the rim to the scratched line of the smaller leaf about every 5 mm.


unikatissima Tomato Tube Leaves
I put both leaves on top of one another with the golden sites outwards and folded back the sections.


unikatissima Tomato Tube Leaves
At the end I stuck the kebab skewer between the leaves.

You can stuck it in also before folding back the sections, just as you like it.


unikatissima Tomato Tube Leaves
My friend additionally glued on the kebab skewer but we both don’t know if this is necessary ;-))


Have much fun decorating your flower boxes and garden flower beds :)

Eggshell Mosaics

unikatissima Egg Shell Mosaics

Up until now I saw eggshell mosaics mostly at ‘kids crafts’, but now I found sites with wonderful (jewelry) pieces.

I already gathered my material, the actual execution is on my list ;-)


Links:
Short description (What are they? Why eggshells? How are they made?)
Mini Movie
Jewelry

Eggshell Mosaic Boxes, z.B.
Eggshell Mosaic Boxes
(you must absolutely click them and look at the larger photos!)

Google search result for ‘Eggshell Mosaics’
Google image search result for ‘Eggshell Mosaics’

Seed Starters

Frugal Seed Starters

I’m a city kid with a brown thumb (all my plants have a very short life) and I don’t have the slightest idea whether I’m too late but I wanted to present it anyhow:

If you seed plants and need seed starters you can buy them.
But you can make them easily yourself: from newspaper, egg shells or egg carton.
Great, isn’t?


Links:
Newspaper Seedling Packs
Eggshell Seed Starters
Egg Carton Seed Starters

Google search result for ‘frugal seed starter’
Google image search result for ‘frugal seed starter’

Self-made Fabric Print Stamp Pad

jezze Fabric Print Stamp Pad

Somewhen I also want to try fabric printing and then the instruction on how to make a fabric print stamp pad will come handy.

I think that it should also be usable as ‘normal’ ink pad, I should try this sometime.


Links:
Self-made Fabric Print Stamp Pad (‘Tech’ update)

Here at unikatissima: Entries with the tag ‘stamping’